Salesforce Developer Certifications Questions and Answers (Dumps and Practice Questions)
Question : In a page layout you can define
1. The organization of fields
2. Custom links
3. Access Mostly Uused Products by 50000+ Subscribers
4. Edit Page

1. 1,2
2. 2,3
3. Access Mostly Uused Products by 50000+ Subscribers
4. 1,2,4
5. 1,2,3,4
Ans : 5 Exp : We can customize different things on page layout like, Fields, Buttons, Custom Links and Related Lists. We can also create sections.
Page layouts are needed to display the data collected in the system. Most of the page layouts are highly customizable while others are very poorly customizable. Page layouts can also be assigned to particular users or a type of record that is Internet. Every object on Force.com has a minimum of three separate page
layouts:
o List view /tab view:
The list view of objects is the first view a user sees. When we click on
the tab of the object we see the list view of that object.
Force.com allows very minimum configuration of the list view. We
can select the fields that are seen on the list view. The list view is also
seen on the related list of the object.
Detail view:
A detail view shows the detail of a single record. To enter the
detail view we can either click on the record name or we can
directly append the record ID in the URL. For example,
http://na1.salesforce.com/RecordID.
The detail view is fully customizable for any standard and custom
object except for a few special objects
Edit view:
The edit view also focuses on the single record, but this provides
input fields to enter and modify the records.
The edit view follows the pattern of detail view and only those fields
are shown in this view, which is editable. The edit view cannot be
customized differently to that of the detail view
Question : Building your User Interface How can you control the different settings of the page layout?

1. You can use the Normal Page Layout Editor
2. You can use the Custom Page Layout Editor
3. Access Mostly Uused Products by 50000+ Subscribers
4. You can use the Any Page Layout Editor
Ans: 3 Exp : The enhanced page layout editor is a feature-rich WYSIWYG tool that allows you to customize your organization's page layouts for detail and edit pages in Salesforce, the Self-Service Portal, and the Salesforce Customer Portal. The enhanced page layout editor is enabled by default and provides all of the functionality of the original page layout editor, as well as additional functionality and an easier-to-use interface.
The enhanced page layout editor has two parts: a palette on the upper portion of the screen and the page layout on the lower portion of the screen. The palette contains the user interface elements, such as fields, actions, buttons, links, related lists, and any additional elements that are available for you to add to the page layout.
When working with the enhanced page layout editor:
" To add a user interface element to the page layout, select the category to which the element belongs on the left column of the palette, and drag the element from the palette to the page layout. You can drag up to 20 s-controls, 20 Visualforce pages, 20 expanded lookups, and 100 related lists onto a page layout. There are no limits on fields and custom links.
" To remove a user interface element from the page layout, drag the element from the page layout to the right side of the palette, or click the icon next to the element.
" Use the undo and redo buttons to step backwards and forwards, respectively.
" Use these keyboard shortcuts.
o Undo = CTRL+Z
o Redo = CTRL+Y
o Quick Save = CTRL+S
" To select multiple elements individually, use CTRL+click. To select multiple elements as a group, use SHIFT+click.
" To change the properties of any element on the page layout, double-click the element or click the wrench icon ( ) next to it. You cannot change the properties of elements in the palette.
" To make a field read-only or required, double-click the field in the page layout and select the Read-Only or Requiredcheckboxes.
" To gain vertical space when working on moving items around within the page layout, click the arrow beneath the palette to collapse it.
" To access the other layouts for an object when viewing or customizing an object with multiple page layouts, click the page layout name at the top of the page and select another layout to view.
" To change the name of the page layout, add personal and public tags if available, and display standard object checkboxes on the page layout, click Layout Properties.
" To review the page layout, click Preview As. From the preview in Enterprise, Unlimited, Performance, and Developer Editions, select a profile to see how the pages will look for users with different profiles. Note that most related lists' columns preview without data.
" To quickly locate any item in the palette, use the Quick Find box. The Quick Find box is especially useful for page layouts that have large numbers of items available in the palette.
" If you're working with a feed-based page layout, click Feed View to customize the tools and components that appear when users are working in the feed on a record.
" To customize the publisher layout for standard and custom objects, override the global publisher layout if necessary and add or remove actions from the Publisher Actions section.
" To choose which related records display in the console's mini view, click Mini Console View. (Available in Professional, Enterprise, Unlimited, Performance, and Developer Edition organizations only.)
" You can't rename a page layout if you're using Salesforce.com Professional Edition.
" Some elements can only be moved to certain locations on the page layout.
" Elements that are already on the page layout still appear on the palette but are inactive. When you click an inactive element on the palette, Salesforce highlights the element on the page layout.
" When you select a category of elements on the palette, such as Related Lists or Custom Links, Salesforce jumps to the part of the page layout where you can add those elements.
" Removing a field from a page layout doesn't remove it from the object's compact layout. The two layout types are independent.
" If the original page layout editor is enabled, users can click on the page layout name to access the detail page of the page layout. The enhanced page layout editor does not have detail pages, as all the detail page functionality is always available on the enhanced editor. Salesforce displays a read-only version of the enhanced page layout editor to users with the "View Setup" permission.
Question : Formulas that span to related objects and reference fields on those objects. These objects can even be across multiple levels of a relationship.
What is this object called ?

1. join-object formula
2. custom-object formula
3. Access Mostly Uused Products by 50000+ Subscribers
4. reference-object formula
5. cross-object formula
Ans : 5
Exp : Cross-object formulas are formulas that span two related objects and reference merge fields on those objects. Cross-object formulas can reference merge fields from a master ("parent") object if an object is on the detail side of a master-detail relationship. You can reference fields from objects that are up to 10 relationships away. Cross-object formulas are available anywhere formulas are used except when creating default values.
Note
If you create a formula that references a field on another object and display that formula in your page layout, users can see the field on the object even if they don't have access to that object record. For example, if you create a formula field on the Case object that references an account field, and display that formula field in the case page layout, users can see this field even if they don't have access to the account record.
Question : When a cross object formula references currency fields of a different currency to that on the record where
the formula is used, Salesforce randomly picks one currency to use.

1. True
2. False
Ans : 2
Exp : One of the most powerful features of the Force.com formula are the cross object
formula fields. In cross object formula fields we can navigate up to five levels of
child-parent-grandparent relationship. Formula fields are calculated on the run time
according to the formula stored in the fields.
" Cross-object formulas that reference currency fields convert the value to the currency of the record that contains the formula. If the referenced currency field is from a custom setting, the field value isn't converted to the record's currency.
" Salesforce allows a maximum of 10 unique relationships per object in cross-object formulas. The limit is cumulative across all formula fields, rules, and lookup filters. For example, if two different formulas on opportunities reference two different fields of an associated account, only one unique relationship exists (from opportunities to accounts).
" You can't reference cross-object formulas in roll-up summary fields.
" In cross-object formulas, you can't reference merge fields for objects related to activities. For example, merge fields for contacts and accounts aren't available in task and event formulas.
Build cross-object formulas to span to related objects and reference merge fields on those objects.
Formula fields can contain up to 3,900 characters, including spaces, return characters, and comments. If your formula requires more characters, create separate formula fields and reference them in another formula field. The maximum number of displayed characters after an evaluation of a formula expression is 1,300 characters.
Because formula fields are automatically calculated, they are read-only on record detail pages and do not update last modified date fields. Formula fields are not visible on edit pages.
In account formulas, all business account fields are available as merge fields. However, account fields exclusive to person accounts such as Birthdate and Email are not available.
" ormula fields that a user can see may reference fields that are hidden or read only using field-level security. If the formula field contains sensitive information, use field-level security to hide it.
" You can add activity formula fields to task and event page layouts. Note that a task-related formula field on an event page layout may not be useful. Likewise, event-related formula fields on task page layouts may not be useful.
" To determine if a record is a task or event, use the IsTask merge field. For example:
IF(IsTask, "This is a task", "This is an event")
Question : What is the limit for cross-object formulas?
1. 1 unique relationships per object across all formulas and rules
2. 10 unique relationships per object across all formulas and rules
3. Access Mostly Uused Products by 50000+ Subscribers
4. 100 unique relationships per object across all formulas and rules
Ans : 2
Exp : Cross-object formulas that reference currency fields convert the value to the currency of the record that contains the formula. If the referenced currency field is from a custom setting, the field value isn't converted to the record's currency.
" Salesforce allows a maximum of 10 unique relationships per object in cross-object formulas. The limit is cumulative across all formula fields, rules, and lookup filters. For example, if two different formulas on opportunities reference two different fields of an associated account, only one unique relationship exists (from opportunities to accounts).
" You can't reference cross-object formulas in roll-up summary fields.
" In cross-object formulas, you can't reference merge fields for objects related to activities. For example, merge fields for contacts and accounts aren't available in task and event formulas.
Question : You cannot reference cross-object formulas in roll-up summary fields.
1. True
2. False
Ans : 1
Exp : Cross-object formulas that reference currency fields convert the value to the currency of the record that contains the formula. If the referenced currency field is from a custom setting, the field value isn't converted to the record's currency.
" Salesforce allows a maximum of 10 unique relationships per object in cross-object formulas. The limit is cumulative across all formula fields, rules, and lookup filters. For example, if two different formulas on opportunities reference two different fields of an associated account, only one unique relationship exists (from opportunities to accounts).
" You can't reference cross-object formulas in roll-up summary fields.
" In cross-object formulas, you can't reference merge fields for objects related to activities. For example, merge fields for contacts and accounts aren't available in task and event formulas
Question : Calculate the sum of all invoice values related to an account record, can be done in ?
1. roll-up summary
2. roll-up aggregate
3. Access Mostly Uused Products by 50000+ Subscribers
4. All of above
Ans : 1
Exp : Calculates values from a set of related records. Example: Calculate the sum of all invoice values related to an account record
Exp : Rollup summary will work only in MASTER DETAIL relationship
Formula field will work in cross objects and individual objects
Rollup summary field will help you to perform some operations in Master detail relationship.
Ex: if you want to findout how many opportunities in account you can create rollup summary field
it also used in reports
It has perform some operations
" COUNT
" SUM
" AVERAGE
" While your formula fields calculate values using fields within a single record, roll-up summary fields calculate values from a set of related records, such as those in a related list. You can create roll-up summary fields that automatically display a value on a master record based on the values of records in a detail record. These detail records must be directly related to the master through a master-detail relationship.For example, a custom account field called Total Invoice Amount displays the sum of invoice amounts for all related invoice custom object records in the Invoices related list on an account.
" You can perform different types of calculations with your roll-up summary fields. You can count the number of detail records related to a master record, or calculate the sum, minimum value, or maximum value of a field in the detail records.
" Before you begin creating roll-up summary fields for your organization, review the implementation tips and best practices.
Create roll-up summary fields on:
" Any custom object that is on the master side of a master-detail relationship
" Any standard object that is on the master side of a master-detail relationship with a custom object
" Opportunities using the values of opportunity products related to the opportunity
" Accounts using the values of related opportunities
" Campaigns using campaign member status or the values of campaign member custom fields
"
Question : What tools available to move migration changes (metadata)?
A. Change Sets
B. DataLoader
C. Force.com IDE
D. Force.com Migration Tool (ANT-Based)
1. A,B
2. A,B,C
3. Access Mostly Uused Products by 50000+ Subscribers
4. A,C,D
5. B,C,D
Ans : 4
Exp : Change Sets : A change set is a means by which one organization can send customizations to another organization. For example, you could create a new object in a sandbox organization and send it to your production organization using a change set. Change sets can only contain modifications you can make through the Setup menu; therefore, you can't use a change set to upload a list of contact records. In other words, change sets contain metadata, not data.
When you want to send customizations from your current organization to another organization, you create an outbound change set. Once you send the change set, the receiving organization sees it as an inbound change set.
Sending a change set between two organizations requires a deployment connection. Change sets can only be sent between organizations that are affiliated with a production organization-for example, a production organization and a sandbox, or two sandboxes created from the same organization.
Force.com IDE : The Force.com IDE is a powerful client application for creating, modifying and deploying Force.com applications. Based on the Eclipse platform and built on the Tooling API, the Force.com IDE provides a comfortable environment for programmers familiar with integrated development environments, letting you code, compile, test, package, and deploy all from within the IDE. Much of the actual work, such as compilation, happens on the Force.com platform-the Force.com IDE performs the communication and result parsing transparently.
The Force.com Migration Tool is a Java/Ant-based command-line utility for moving metadata between a local directory and a Salesforce organization. The Force.com Migration Tool is especially useful in the following scenarios:
" Development projects where you need to populate a test environment with large amounts of setup changes - Making these changes using a Web interface could take a long time.
" Multistage release processes - A typical development process requires iterative building, testing, and staging before releasing to a production environment. Scripted retrieval and deployment of components can make this process much more efficient.
" Repetitive deployment using the same parameters - You can retrieve all the metadata in your organization, make changes, and deploy a subset of components. If you need to repeat this process, it's as simple as calling the same deployment target again.
" When migrating from stage to production is done by IT - Anyone that prefers deploying in a scripting environment will find the Force.com Migration Tool a familiar process.
Question : When might you need to migrate configuration changes?
1. You might need to migrate customizations like apps, objects, code from a development sandbox to a training sandbox
2. You might need to migrate customizations like apps, objects, code from a development sandbox to a training sandbox
3. Access Mostly Uused Products by 50000+ Subscribers
4. All of the above
Ans : 4
Exp : You might need to migrate customizations like apps, objects, code, reports or email templates from a development sandbox to a training sandbox or production environment
Exp : The Force.com Migration Tool is a Java/Ant-based command-line utility for moving metadata between a local directory and a Salesforce organization. The Force.com Migration Tool is especially useful in the following scenarios:
" Development projects where you need to populate a test environment with large amounts of setup changes - Making these changes using a Web interface could take a long time.
" Multistage release processes - A typical development process requires iterative building, testing, and staging before releasing to a production environment. Scripted retrieval and deployment of components can make this process much more efficient.
" Repetitive deployment using the same parameters - You can retrieve all the metadata in your organization, make changes, and deploy a subset of components. If you need to repeat this process, it's as simple as calling the same deployment target again.
" When migrating from stage to production is done by IT - Anyone that prefers deploying in a scripting environment will find the Force.com Migration Tool a familiar process.
Question : Approval processes are not available in a change set.
1. True
2. False
Ans : 1
Exp : A change set is a means by which one organization can send customizations to another organization. For example, you could create a new object in a sandbox organization and send it to your production organization using a change set. Change sets can only contain modifications you can make through the Setup menu; therefore, you can't use a change set to upload a list of contact records. In other words, change sets contain metadata, not data.
When you want to send customizations from your current organization to another organization, you create an outbound change set. Once you send the change set, the receiving organization sees it as an inbound change set.
Sending a change set between two organizations requires a deployment connection. Change sets can only be sent between organizations that are affiliated with a production organization-for example, a production organization and a sandbox, or two sandboxes created from the same organization.
Understand these restrictions before you include approval processes in change sets.
" If the approval page fields include any custom fields on standard objects, you need to manually add those custom fields to outbound change sets. The View/Add Dependencies option for selecting change set components won't include these fields.
" If the approval process references any post templates that contain custom fields, then you need to resave those post templates in the originating organization before adding them to the change set. From Setup, click Create | Workflow and Approvals | Post Templates. For each post template, click Edit and then Save.
" Change sets don't include the order of active approval processes from the source organization. You may need to reorder the approval processes in the destination organization after deployment.
If you change the Unique Name of an approval process that was previously included in a change set and deployed in another organization, and you resend the approval process via a change set, a new approval process will be created upon deployment in the other organization. The previously deployed approval process will not be modified.
Question : A change set can be used to deploy metadata only between _____________orgs
1. Different
2. Related
3. Access Mostly Uused Products by 50000+ Subscribers
4. Same
5. all
Ans : 2
Exp : A change set is a means by which one organization can send customizations to another organization. For example, you could create a new object in a sandbox organization and send it to your production organization using a change set. Change sets can only contain modifications you can make through the Setup menu; therefore, you can't use a change set to upload a list of contact records. In other words, change sets contain metadata, not data.
When you want to send customizations from your current organization to another organization, you create an outbound change set. Once you send the change set, the receiving organization sees it as an inbound change set.
Sending a change set between two organizations requires a deployment connection. Change sets can only be sent between organizations that are affiliated with a production organization-for example, a production organization and a sandbox, or two sandboxes created from the same organization.
Understand these restrictions before you include approval processes in change sets.
" If the approval page fields include any custom fields on standard objects, you need to manually add those custom fields to outbound change sets. The View/Add Dependencies option for selecting change set components won't include these fields.
" If the approval process references any post templates that contain custom fields, then you need to resave those post templates in the originating organization before adding them to the change set. From Setup, click Create | Workflow and Approvals | Post Templates. For each post template, click Edit and then Save.
" Change sets don't include the order of active approval processes from the source organization. You may need to reorder the approval processes in the destination organization after deployment.
If you change the Unique Name of an approval process that was previously included in a change set and deployed in another organization, and you resend the approval process via a change set, a new approval process will be created upon deployment in the other organization. The previously deployed approval process will not be modified.
Question : What happens if component of a change set fails to deploy?
1. Except the failed component, all other components of the change set get deployed
2. The entire change set gets deployed
3. Access Mostly Uused Products by 50000+ Subscribers
4. The deployment time increases
Correct Answer : Get Lastest Questions and Answer :
Explanation: Deploying a Change Set
To deploy a change set:
1. From Setup, click Deploy | Inbound Change Sets.
2. In the Change Sets Awaiting Deployment list, click the name of the change set you want to deploy.
3. Access Mostly Uused Products by 50000+ Subscribers
A change set is deployed in a single transaction. If the deployment is unable to complete for any reason, the entire transaction is rolled back. After a deployment completes successfully, all changes are committed to your organization and the deployment can't be rolled back.
Note
The Force.com platform requires that at least 75% of your code is covered by unit tests before you can deploy it to a production organization. Ideally, you should strive for 100% coverage. The code coverage restriction is not enforced for sandbox or Developer Edition organizations.
Question : Change sets can be used to move data and metadata from one organization to another.
1. True
2. False
Ans : 2
Exp : A change set is a means by which one organization can send customizations to another organization. For example, you could create a new object in a sandbox organization and send it to your production organization using a change set. Change sets can only contain modifications you can make through the Setup menu; therefore, you can't use a change set to upload a list of contact records. In other words, change sets contain metadata, not data.
When you want to send customizations from your current organization to another organization, you create an outbound change set. Once you send the change set, the receiving organization sees it as an inbound change set.
Sending a change set between two organizations requires a deployment connection. Change sets can only be sent between organizations that are affiliated with a production organization-for example, a production organization and a sandbox, or two sandboxes created from the same organization.
Understand these restrictions before you include approval processes in change sets.
" If the approval page fields include any custom fields on standard objects, you need to manually add those custom fields to outbound change sets. The View/Add Dependencies option for selecting change set components won't include these fields.
" If the approval process references any post templates that contain custom fields, then you need to resave those post templates in the originating organization before adding them to the change set. From Setup, click Create | Workflow and Approvals | Post Templates. For each post template, click Edit and then Save.
" Change sets don't include the order of active approval processes from the source organization. You may need to reorder the approval processes in the destination organization after deployment.
If you change the Unique Name of an approval process that was previously included in a change set and deployed in another organization, and you resend the approval process via a change set, a new approval process will be created upon deployment in the other organization. The previously deployed approval process will not be modified.
Question : Which of the level of access available through Organization-wide Defaults?
1. Public Read/write - View and edit all records
2. Public Read Only - View all records
3. Access Mostly Uused Products by 50000+ Subscribers
4. 1 and 3
5. 1,2 and 3
Ans : 5
Exp : Organization-wide sharing settings specify the default level of access to records and can be set separately for accounts (including assets and contracts), activities, contacts, campaigns, cases, leads, opportunities, calendars, price books, and custom objects.
For most objects, organization-wide sharing settings can be set to Private, Public Read Only, or Public Read/Write. In environments where the organization-wide sharing setting for an object is Private or Public Read Only, an administrator can grant users additional access to records by setting up a role hierarchy or defining sharing rules. However, sharing rules can only be used to grant additional access-they cannot be used to restrict access to records beyond what was originally specified with the organization-wide sharing defaults.
Important
If your organization uses a Customer Portal, before you enable contacts to access the portal, set the organization-wide sharing defaults on accounts, contacts, contracts, assets, and cases to Private. This ensures that by default your customers can view only their own data. You can still grant your Salesforce users Public Read/Write access by creating sharing rules in which all internal users share with all internal users.
By default, Salesforce uses hierarchies, like the role or territory hierarchy, to automatically grant access of records to users above the record owner in the hierarchy.
Setting an object to Private makes those records visible only to record owners and those above them in the role hierarchy. Use the Grant Access Using Hierarchies checkbox to disable access to records to users above the record owner in the hierarchy for custom objects in Professional, Enterprise, Unlimited, Performance, and Developer Edition. If you deselect this checkbox for a custom object, only the record owner and users granted access by the organization-wide defaults receive access to the records.
Question : Select correct statement for Organization-wide ?
1. Organization-wide sharing settings specify the default level of access to records
2. Organization-wide can not be set separately for accounts (including assets and contracts), activities, contacts, campaigns, cases, leads, opportunities, calendars, price books, and custom objects.
3. Access Mostly Uused Products by 50000+ Subscribers
4. 1 and 2
5. 1 and 3.
Ans : 5
Exp :Organization-wide sharing settings specify the default level of access to records and can be set separately for accounts (including assets and contracts), activities, contacts, campaigns, cases, leads, opportunities, calendars, price books, and custom objects.
For most objects, organization-wide sharing settings can be set to Private, Public Read Only, or Public Read/Write. In environments where the organization-wide sharing setting for an object is Private or Public Read Only, an administrator can grant users additional access to records by setting up a role hierarchy or defining sharing rules. However, sharing rules can only be used to grant additional access-they cannot be used to restrict access to records beyond what was originally specified with the organization-wide sharing defaults.
Important
If your organization uses a Customer Portal, before you enable contacts to access the portal, set the organization-wide sharing defaults on accounts, contacts, contracts, assets, and cases to Private. This ensures that by default your customers can view only their own data. You can still grant your Salesforce users Public Read/Write access by creating sharing rules in which all internal users share with all internal users.
By default, Salesforce uses hierarchies, like the role or territory hierarchy, to automatically grant access of records to users above the record owner in the hierarchy.
Setting an object to Private makes those records visible only to record owners and those above them in the role hierarchy. Use the Grant Access Using Hierarchies checkbox to disable access to records to users above the record owner in the hierarchy for custom objects in Professional, Enterprise, Unlimited, Performance, and Developer Edition. If you deselect this checkbox for a custom object, only the record owner and users granted access by the organization-wide defaults receive access to the records.
Organization-wide default summarized
To set up organization-wide defaults follow the simple method:
o First find out which user requires least access to an object. Set the
organization-wide default to all the objects based on this user. For example,
the library clerk is the person in a library who mostly handles the issuing
and the return of the books. He needs the least access on the customer object
(assuming that only the librarian can handle membership) set the customer
object to private read only.
o Most restrictive record access is defined using a organization-wide default.
Access to additional records is made available through the role hierarchy,
sharing rules, and manual sharing.
o Changing organization-wide default settings can delete manual sharing if
that sharing is no longer needed.
Question : What is the name of the default public group to which all users are added?
1. All Default Users
2. All Custom Users
3. Access Mostly Uused Products by 50000+ Subscribers
4. All Group Users
Ans : 3
Exp : "All Internal Users" would exclude all your Partner Portal and Customer Portal users (community users). If you do not have any Communities or portals implemented then "All internal users" would refer to all the users you currently have in your edition.
If you are sharing with 'All Internal Users', then the record owner doesn't matter. As long as the User trying to view the record is not a Community or Portal User, they will be able to see the record.
After you enable your partner portal, the following groups and sharing rule category are created:
Group or Category Description
All Partner Portal Users group Contains all partner portal users in your organization
All Internal Users group Contains all Salesforce users in your organization
Roles and Internal Subordinates sharing rule category Allows you to create sharing rules in which you can choose specific Salesforce users in your organization by role plus all of the users in roles below that role, excluding any partner portal roles
You can use these groups and the sharing rule category to easily create sharing rules that grant all of your partner portal or Salesforceusers access to specific data. You can also create sharing rules between partner portal users and Salesforce users, but not between partner users associated with different partner accounts.
If Salesforce Knowledge is enabled in your partner portal, portal users can see articles as permitted by the category group visibility settings.
Question : Who gets full access to a record ?
1. Record Owner
2. User in a role higher than the owner in the role hierarchy
3. Access Mostly Uused Products by 50000+ Subscribers
4. All of above
Ans : 4
Exp : Granting Access to Records
Users can manually grant other users access to certain kinds of records, including accounts, contacts, and leads. In some cases, granting access to one record includes access to all its associated records. This method of granting access is also known as a manual share. For example, if you grant another user access to an account, the user will automatically have access to all the opportunities and cases associated with that account.
To grant access to a record, you must be one of these.
" The record owner
" A user in a role above the owner in the hierarchy (if your organization's sharing settings control access through hierarchies)
" Any user granted "Full Access" to the record
" An administrator
In organizations with over 2,000 users, roles, and groups, if your query doesn't match any items in a particular category that category won't show up in the Search drop-down menu. For example, if none of your group names contain the string "CEO," after searching for "CEO" you'll notice the Groups option no longer appears in the drop-down. If you enter a new search term, all of the categories will still be searched even if they don't appear in the list. You can repopulate the drop-down by clearing your search terms and pressing Find.
Question : Sharing rules are used to further restrict access defined in the Organization-wide Default settings.
1. True
2. False
Ans : 2
Exp : Sharing rules allow you to selectively grant data access to defined sets of users. Review the following notes before using sharing rules:
Granting Access
" You can use sharing rules to grant wider access to data. You cannot restrict access below your organization-wide default levels.
" If multiple sharing rules give a user different levels of access to a record, the user gets the most permissive access level.
" Sharing rules automatically grant additional access to related records. For example, opportunity sharing rules give role or group members access to the account associated with the shared opportunity if they do not already have it. Likewise, contact and case sharing rules provide the role or group members with access to the associated account as well.
" Users in the role hierarchy are automatically granted the same access that users below them in the hierarchy have from a sharing rule, provided that the object is a standard object or the Grant Access Using Hierarchies option is selected.
" Regardless of sharing rules, users can, at a minimum, view the accounts in their territories. Also, users can be granted access to view and edit the contacts, opportunities, and cases associated with their territories' accounts.
Updating
" Creating an owner-based sharing rule with the same source and target groups as an existing rule overwrites the existing rule.
" Once a sharing rule has been saved, you can't change the Share with field settings when you edit the sharing rule.
" Sharing rules apply to all new and existing records that meet the definition of the source data set.
" Sharing rules apply to both active and inactive users.
" When you change the access levels for a sharing rule, all existing records are automatically updated to reflect the new access levels.
" When you delete a sharing rule, the sharing access created by that rule is automatically removed.
" When you modify which users are in a group, role, or territory, the sharing rules are reevaluated to add or remove access as necessary.
" When you transfer records from one user to another, the sharing rules are reevaluated to add or remove access to the transferred records as necessary.
" Making changes to sharing rules may require changing a large number of records at once. To process these changes efficiently, your request may be queued and you may receive an email notification when the process has completed.
" Lead sharing rules do not automatically grant access to lead information after leads are converted into account, contact, and opportunity records.
Portal Users
" You can create rules to share records between most types of Customer Portal users and Salesforce users. Similarly, you can create sharing rules between Customer Portal users from different accounts as long as they have the Customer Portal Manager user license. However, you can't include high-volume portal users in sharing rules because they don't have roles and can't be in public groups.
" You can easily convert sharing rules that include Roles, Internal and Portal Subordinates to include Roles and Internal Subordinates instead by using the Convert Portal User Access wizard. Furthermore, you can use this wizard to convert any publicly accessible report, dashboard, and document folders to folders that are accessible by all users except for portal users.
Question : Sharing Rules : Created to grant access to records between users when access does not roll-up through the role hierarchy
1. True
2. False
Ans : 1
Exp : Sharing rules allow you to selectively grant data access to defined sets of users. Review the following notes before using sharing rules:
Granting Access
" You can use sharing rules to grant wider access to data. You cannot restrict access below your organization-wide default levels.
" If multiple sharing rules give a user different levels of access to a record, the user gets the most permissive access level.
" Sharing rules automatically grant additional access to related records. For example, opportunity sharing rules give role or group members access to the account associated with the shared opportunity if they do not already have it. Likewise, contact and case sharing rules provide the role or group members with access to the associated account as well.
" Users in the role hierarchy are automatically granted the same access that users below them in the hierarchy have from a sharing rule, provided that the object is a standard object or the Grant Access Using Hierarchies option is selected.
" Regardless of sharing rules, users can, at a minimum, view the accounts in their territories. Also, users can be granted access to view and edit the contacts, opportunities, and cases associated with their territories' accounts.
Updating
" Creating an owner-based sharing rule with the same source and target groups as an existing rule overwrites the existing rule.
" Once a sharing rule has been saved, you can't change the Share with field settings when you edit the sharing rule.
" Sharing rules apply to all new and existing records that meet the definition of the source data set.
" Sharing rules apply to both active and inactive users.
" When you change the access levels for a sharing rule, all existing records are automatically updated to reflect the new access levels.
" When you delete a sharing rule, the sharing access created by that rule is automatically removed.
" When you modify which users are in a group, role, or territory, the sharing rules are reevaluated to add or remove access as necessary.
" When you transfer records from one user to another, the sharing rules are reevaluated to add or remove access to the transferred records as necessary.
" Making changes to sharing rules may require changing a large number of records at once. To process these changes efficiently, your request may be queued and you may receive an email notification when the process has completed.
" Lead sharing rules do not automatically grant access to lead information after leads are converted into account, contact, and opportunity records.
Portal Users
" You can create rules to share records between most types of Customer Portal users and Salesforce users. Similarly, you can create sharing rules between Customer Portal users from different accounts as long as they have the Customer Portal Manager user license. However, you can't include high-volume portal users in sharing rules because they don't have roles and can't be in public groups.
You can easily convert sharing rules that include Roles, Internal and Portal Subordinates to include Roles and Internal Subordinates instead by using the Convert Portal User Access wizard. Furthermore, you can use this wizard to convert any publicly accessible report, dashboard, and document folders to folders that are accessible by all users except for portal users
Question : Read/Write Read Only Full access cannot be granted through sharing rules.
1. True
2. False
Ans : 1
Exp : Check your Organization Wide Default for Contacts under Setup | Security Controls | Sharing Settings. If Contact Sharing is set to "Controlled by parent", then sharing access to Contacts is controlled by access to the related Account record.
When Contact Sharing is set to "Controlled by parent", Contacts may not be shared independently from Accounts, so Contact Sharing Rules are not applied (even if they are defined).
To address this you can either set up an Account sharing rule to share the Accounts the Contacts are related to, or you can change the Org Wide Default for Contacts to a value other than "Controlled by parent" ('Private' or 'Public Read-Only', for example) so that the Contact Sharing Rules will apply.
NOTE: Changes to Organization Wide Defaults can only be made by System Administrators.
Sharing rules allow you to selectively grant data access to defined sets of users. Review the following notes before using sharing rules:
Granting Access
" You can use sharing rules to grant wider access to data. You cannot restrict access below your organization-wide default levels.
" If multiple sharing rules give a user different levels of access to a record, the user gets the most permissive access level.
" Sharing rules automatically grant additional access to related records. For example, opportunity sharing rules give role or group members access to the account associated with the shared opportunity if they do not already have it. Likewise, contact and case sharing rules provide the role or group members with access to the associated account as well.
" Users in the role hierarchy are automatically granted the same access that users below them in the hierarchy have from a sharing rule, provided that the object is a standard object or the Grant Access Using Hierarchies option is selected.
" Regardless of sharing rules, users can, at a minimum, view the accounts in their territories. Also, users can be granted access to view and edit the contacts, opportunities, and cases associated with their territories' accounts.
Updating
" Creating an owner-based sharing rule with the same source and target groups as an existing rule overwrites the existing rule.
" Once a sharing rule has been saved, you can't change the Share with field settings when you edit the sharing rule.
" Sharing rules apply to all new and existing records that meet the definition of the source data set.
" Sharing rules apply to both active and inactive users.
" When you change the access levels for a sharing rule, all existing records are automatically updated to reflect the new access levels.
" When you delete a sharing rule, the sharing access created by that rule is automatically removed.
" When you modify which users are in a group, role, or territory, the sharing rules are reevaluated to add or remove access as necessary.
" When you transfer records from one user to another, the sharing rules are reevaluated to add or remove access to the transferred records as necessary.
" Making changes to sharing rules may require changing a large number of records at once. To process these changes efficiently, your request may be queued and you may receive an email notification when the process has completed.
" Lead sharing rules do not automatically grant access to lead information after leads are converted into account, contact, and opportunity records.
Portal Users
" You can create rules to share records between most types of Customer Portal users and Salesforce users. Similarly, you can create sharing rules between Customer Portal users from different accounts as long as they have the Customer Portal Manager user license. However, you can't include high-volume portal users in sharing rules because they don't have roles and can't be in public groups.
" You can easily convert sharing rules that include Roles, Internal and Portal Subordinates to include Roles and Internal Subordinates instead by using the Convert Portal User Access wizard. Furthermore, you can use this wizard to convert any publicly accessible report, dashboard, and document folders to folders that are accessible by all users except for portal users.
Question : When a user needs access to an Individual record, a user will full access to the records can not add manual sharing to a record.
1. True
2. False
Ans : 2
Exp : When a user needs access to an Individual record, a user will full access to the records can add manual sharing to a record.
Sharing Rules are used when there is the need for records to be edited by multiple users within an organization, but the users are not connected by a vertical hierarchy. With these rules, record access can be granted with groups or individuals based on permission by the owner.
There are two types of Sharing Rules:
Manual Sharing - Users with Full Access to a record can share access to the record with a user or group of users. Manual Sharing should be used when a small number of records need to be shared between individuals that are not in the same Role Hierarchy. The owner of the record can give access to the few users or groups that need it.
In the past we have used manual sharing to handle the following situations:
" A user can share an otherwise Private Account that needs to be worked on with multiple users in order to collaborate on a large deal. In the case of some of our clients, they will use manual sharing for a national Account that users from multiple geographical areas working on.
" Some organizations promote manual sharing for giving access to experts in certain areas - for example, if a Sales Rep has expertise in a specific industry then he/she may be given access to an Account in that industry that is not necessarily within the assigned territory.
" We have other clients where strategic managers will give read access to accounts to give visibility into what is happening across territories.
Automatic Sharing - When using a workflow, we can set a field on the record to determine when access should or should not be granted to individual users or groups. With Automatic Sharing there is less work for the owner of the record, and less opportunity for users to have unwanted or inappropriate record access.
We tend to use automatic sharing to handle one-off security requirements that our clients have. For example:
" Team Selling on an Account where the team is not vertically connected is a great place to use automatic sharing. All users on the team need access to the Account, but we still want the Account to be Private for the rest of the organization.
" We tend to use indicators (i.e. checkboxes) on Accounts to define if the Accounts are corporate Accounts or Strategic Accounts. These indicators are used with automatic sharing to ensure the right people have access.
" In the past we have used automatic sharing rules to extend read/write access to support personnel within an organization.
" We have also used automatic sharing rules to extend read/write privileges to dislocated teams when we do not want to set the record owner to a Queue.
Sharing Rules are a great tool within Salesforce.com that allows us to handle requirements that are often one-off security requirements that cannot be easily handled without creating a large number of profiles. Since it is important to be able to cooperate with each other in Salesforce.com, while still maintaining security on records; this can be done with Sharing Rules.
Considerations and Limits of Sharing Rules
" Sharing Rules cannot be stricter than Organization Wide Defaults. If access needs to be restricted, another type of security should be used. Sharing rules are typically used to extend access to records.
" Manual Sharing is only available on individual records, it is not available for all records of a certain object.
" Sharing Rules are only applicable on records that have Private or Public Read Only access.
" With Sharing Rules you have the option to give read only or read/write access to records. We recommend being very conscious of what level of security users really need (i.e. is the access for informational purposes only or full collaboration).
" When setting Automatic and Manual Sharing users and admins have the ability to define if the security should be extended to related records. Make sure that extending the security makes sense before making the final decision to give this access.
Question : Select the correct statement
1. Apex sharing reasons can be also selected when manually sharing a record. Exist only for custom objects.
2. Apex sharing can be created declaratively but are used by developers to define reasons for access.
3. Access Mostly Uused Products by 50000+ Subscribers
4. 1 and 2
5. 1 and 3
Correct Answer : Get Lastest Questions and Answer :
Explanation: Can be created declaratively but are used by developers to define reasons for access. Apex sharing reasons can be also selected when manually sharing a record. Exist only for custom objects.
Explanation:
User Permissions Needed
To create Apex sharing reasons: "Author Apex"
To view Apex sharing reasons: "View Setup and Configuration"
When creating Apex managed sharing, create Apex sharing reasons for individual custom objects to indicate why sharing was implemented, simplify the coding required to update and delete sharing records, and share a record multiple times with the same user or group using different Apex sharing reasons.
Salesforce displays Apex sharing reasons in the Reason column when viewing the sharing for a custom object record in the user interface. This allows users and administrators to understand the purpose of the sharing.
When working with Apex sharing reasons, note the following:
" Only users with the "Modify All Data" permission can add, edit, or delete sharing that uses an Apex sharing reason.
" Deleting an Apex sharing reason will delete all sharing on the object that uses the reason.
" You can create up to 10 Apex sharing reasons per custom object.
" You can create Apex sharing reasons using the Metadata API.
Salesforce automatically recalculates sharing for all records on an object when its organization-wide sharing default access level changes. The recalculation includes access granted by sharing rules. In addition, all types of sharing are removed if the access they grant is redundant. For example, the manual sharing which grants Read Only access to a user is deleted when the object's sharing model is changed from Private to Public Read Only.
Apex managed sharing allows developers to programmatically share custom objects. When you use Apex managed sharing to share a custom object, only users with the "Modify All Data" permission can add or change the sharing on the custom object's record, and the sharing access is maintained across record owner changes.
Question : What levels of access can be granted through manual sharing?
1. Full Access
2. Read/Write
3. Access Mostly Uused Products by 50000+ Subscribers
4. All of the above
Ans : 4
Exp : Manual Sharing - Users with Full Access to a record can share access to the record with a user or group of users. Manual Sharing should be used when a small number of records need to be shared between individuals that are not in the same Role Hierarchy. The owner of the record can give access to the few users or groups that need it.
In the past we have used manual sharing to handle the following situations:
" A user can share an otherwise Private Account that needs to be worked on with multiple users in order to collaborate on a large deal. In the case of some of our clients, they will use manual sharing for a national Account that users from multiple geographical areas working on.
" Some organizations promote manual sharing for giving access to experts in certain areas - for example, if a Sales Rep has expertise in a specific industry then he/she may be given access to an Account in that industry that is not necessarily within the assigned territory.
We have other clients where strategic managers will give read access to accounts to give visibility into what is happening across territories.
Adding or Removing Sharing Access Manually
" The ability to manually extend the sharing access of individual records is controlled by administrators, the record owner, users in a role hierarchy above the record owner, and any user that has been granted "Full Access."
" Changing your sharing model deletes any manual shares your users have created.
Question : If a developer wants to set up access in such a way that managers always see records
owned by their subordinates, which feature should the developer use?
1. Organization-wide defaults
2. Role hierarchy
3. Access Mostly Uused Products by 50000+ Subscribers
4. Profiles
Ans : 2
Exp : Roles and profiles : The security of the system depends on how the data is shared with the users and how to prevent access to the unauthorized user. Roles and profiles together determine how the data is accessed by the actors in the system. The role determines what data the user can accesses, while the profile determines all things the user can do with the data.
Understanding profiles : A profile contains information on what the user should see and what he can do in the force.com application. The profiles control the following things: o What apps the user can see o What tabs the users are permitted to use o What objects can the user operate on and what CRUD-level permission is
given to them o The profile also determines the default RecordType and the default page layout available for the user o Fields can be enabled or restricted for the profile o What Apex class and Visualforce codes are accessible for the user o The profile also determines the hours in which the user logs in as well as the
IP restriction o What all system-level configurations are the users permitted to change is also controlled by the profile
Assigning roles : Roles are created according to the corporate hierarchy of the system. Roles determine how the data is shared with the user. While profiles determine what objects can be seen by which users, roles determine which records from the object can be seen by the user. The user can be separated on the basis of their work department, territory, or company hierarchy.
As seen in the diagram A, B, C, and D are records of the same objects owned by Rep1, Rep2, Rep3, and Rep4 respectively. While all the four reps have access to the same objects, they do not have access to each other's records. Manager 1 can see the data and reports from Rep1 and Rep2 as they come under his hierarchy. He cannot, however, access the data for Rep3 and Rep4. The Super Manager can see the entire organizations data as he is topmost in the hierarchy. Role hierarchy prevents the data being seen by people at the same level in the hierarchy, at the same time it grants full access to the people on top of the hierarchy. In the above example, Manager 1 will get all access to the Rep1 data.
Organization-Wide defaults : While roles and profiles are used to determine the user-based security, the organization wide default determines the distribution of data with the user. We use the defaults in the object to determine which people across the role hierarchy can access which objects. Objects allowed to be viewed by the organization wide defaults can be restricted using profiles and roles.
The following options determine the sharing settings of the object: Private The role hierarchy is observed and people cannot view their peer records. In the figure above, Rep1 cannot see the data for Rep2 in the object that has private settings Public Read Only This is useful if we have master data that the people refer to for example, the books info in the library. They can be kept public read only. In this case everyone across the hierarchy can see the data Publix Read/ Write This option does not obey any role hierarchy and anyone can edit/ modify or even delete the objects depending on their profile permissions.
Organization-wide default summarized To set up organization-wide defaults follow the simple method: o First find out which user requires least access to an object. Set the organization-wide default to all the objects based on this user. For example, the library clerk is the person in a library who mostly handles the issuing
and the return of the books. He needs the least access on the customer object (assuming that only the librarian can handle membership) set the customer
object to private read only. o Most restrictive record access is defined using a organization-wide default. Access to additional records is made available through the role hierarchy, sharing rules, and manual sharing. o Changing organization-wide default settings can delete manual sharing if that sharing is no longer needed.
Sharing rules : Sharing rules are the special sets of privileges set by the administrator to automatically grant record access to certain users or the group of users. There is a limit of 100 owner-based sharing rules. Sharing rules can allow the records for the user, which are restricted by the roles. However, if the object is not visible to the user profile, the records cannot be made visible by sharing rules. Sharing rules are one-off sharing options for complex sharing logic that cannot fit in the normal sharing structure.
Manual sharing : Finally, the last option in sharing is the manual sharing option given to the individual users with full access to a record. It is used if the organization wide defaults access for the object is set to Private. This is generally done by a record owner, for a single record. Only the record owner and users above the owner in the role hierarchy are granted full access to the record. It is not possible to grant other users full access. Users with the Modify All object-level permission for the given object or the Modify All Data permission can also manually share a record. User-managed sharing is removed when the record owner changes or when the access granted in the sharing does not grant additional access beyond the object's organization-wide sharing default access level.
Question : If a user needs to give access to just one record, which feature should they use?
1. Roles
2. Role Hierarchy
3. Access Mostly Uused Products by 50000+ Subscribers
4. Manual Sharing
Ans : 4
Exp :Roles and profiles : The security of the system depends on how the data is shared with the users and how to prevent access to the unauthorized user. Roles and profiles together determine how the data is accessed by the actors in the system. The role determines what data the user can accesses, while the profile determines all things the user can do with the data.
Understanding profiles : A profile contains information on what the user should see and what he can do in the force.com application. The profiles control the following things: o What apps the user can see o What tabs the users are permitted to use o What objects can the user operate on and what CRUD-level permission is
given to them o The profile also determines the default RecordType and the default page layout available for the user o Fields can be enabled or restricted for the profile o What Apex class and Visualforce codes are accessible for the user o The profile also determines the hours in which the user logs in as well as the
IP restriction o What all system-level configurations are the users permitted to change is also controlled by the profile
Assigning roles : Roles are created according to the corporate hierarchy of the system. Roles determine how the data is shared with the user. While profiles determine what objects can be seen by which users, roles determine which records from the object can be seen by the user. The user can be separated on the basis of their work department, territory, or company hierarchy.
As seen in the diagram A, B, C, and D are records of the same objects owned by Rep1, Rep2, Rep3, and Rep4 respectively. While all the four reps have access to the same objects, they do not have access to each other's records. Manager 1 can see the data and reports from Rep1 and Rep2 as they come under his hierarchy. He cannot, however, access the data for Rep3 and Rep4. The Super Manager can see the entire organizations data as he is topmost in the hierarchy. Role hierarchy prevents the data being seen by people at the same level in the hierarchy, at the same time it grants full access to the people on top of the hierarchy. In the above example, Manager 1 will get all access to the Rep1 data.
Organization-Wide defaults : While roles and profiles are used to determine the user-based security, the organization wide default determines the distribution of data with the user. We use the defaults in the object to determine which people across the role hierarchy can access which objects. Objects allowed to be viewed by the organization wide defaults can be restricted using profiles and roles.
The following options determine the sharing settings of the object: Private The role hierarchy is observed and people cannot view their peer records. In the figure above, Rep1 cannot see the data for Rep2 in the object that has private settings Public Read Only This is useful if we have master data that the people refer to for example, the books info in the library. They can be kept public read only. In this case everyone across the hierarchy can see the data Publix Read/ Write This option does not obey any role hierarchy and anyone can edit/ modify or even delete the objects depending on their profile permissions.
Organization-wide default summarized To set up organization-wide defaults follow the simple method: o First find out which user requires least access to an object. Set the organization-wide default to all the objects based on this user. For example, the library clerk is the person in a library who mostly handles the issuing
and the return of the books. He needs the least access on the customer object (assuming that only the librarian can handle membership) set the customer
object to private read only. o Most restrictive record access is defined using a organization-wide default. Access to additional records is made available through the role hierarchy, sharing rules, and manual sharing. o Changing organization-wide default settings can delete manual sharing if that sharing is no longer needed.
Sharing rules : Sharing rules are the special sets of privileges set by the administrator to automatically grant record access to certain users or the group of users. There is a limit of 100 owner-based sharing rules. Sharing rules can allow the records for the user, which are restricted by the roles. However, if the object is not visible to the user profile, the records cannot be made visible by sharing rules. Sharing rules are one-off sharing options for complex sharing logic that cannot fit in the normal sharing structure.
Manual sharing : Finally, the last option in sharing is the manual sharing option given to the individual users with full access to a record. It is used if the organization wide defaults access for the object is set to Private. This is generally done by a record owner, for a single record. Only the record owner and users above the owner in the role hierarchy are granted full access to the record. It is not possible to grant other users full access. Users with the Modify All object-level permission for the given object or the Modify All Data permission can also manually share a record. User-managed sharing is removed when the record owner changes or when the access granted in the sharing does not grant additional access beyond the object's organization-wide sharing default access level.
Question : What is the most restrictive Organization-wide default?
1. Read/Write
2. Read Only
3. Access Mostly Uused Products by 50000+ Subscribers
4. Hidden
Ans : 3
Exp :Organization-wide sharing settings specify the default level of access to records and can be set separately for accounts (including assets and contracts), activities, contacts, campaigns, cases, leads, opportunities, calendars, price books, and custom objects.
Available in: Professional, Enterprise, Performance, Unlimited, Developer, and Database.com Editions.
Customer Portal is not available in Database.com
For most objects, organization-wide sharing settings can be set to Private, Public Read Only, or Public Read/Write. In environments where the organization-wide sharing setting for an object is Private or Public Read Only, an administrator can grant users additional access to records by setting up a role hierarchy or defining sharing rules. However, sharing rules can only be used to grant additional access-they cannot be used to restrict access to records beyond what was originally specified with the organization-wide sharing defaults.
Important
If your organization uses a Customer Portal, before you enable contacts to access the portal, set the organization-wide sharing defaults on accounts, contacts, contracts, assets, and cases to Private. This ensures that by default your customers can view only their own data. You can still grant your Salesforce users Public Read/Write access by creating sharing rules in which all internal users share with all internal users.
By default, Salesforce uses hierarchies, like the role or territory hierarchy, to automatically grant access of records to users above the record owner in the hierarchy.
Setting an object to Private makes those records visible only to record owners and those above them in the role hierarchy. Use the Grant Access Using Hierarchies checkbox to disable access to records to users above the record owner in the hierarchy for custom objects in Professional, Enterprise, Unlimited, Performance, and Developer Edition. If you deselect this checkbox for a custom object, only the record owner and users granted access by the organization-wide defaults receive access to the records.
============================================================================================
As you have completed third Question Paper, we would like to suggest you that, please
do not memorize any question and answer, understand each Question and Answers in depth.
From this simulator you will get similar questions in real exam.
============================================================================================
Question : Which statement is true?
1. Child records in mater-detail relationships have their own org-wide defaults.
2. Org-wide defaults can be set for both standard and custom objects.
3. Access Mostly Uused Products by 50000+ Subscribers
4. Sharing rules are used to restrict access to records.
Ans : 2
Exp : The organization-wide sharing default setting can't be changed for some objects:
" Solutions are always Public Read/Write.
" Service contracts are always Private.
" The ability to view or edit a document, report, or dashboard is based on a user's access to the folder in which it's stored.
" Users can only view the forecasts of other users who are placed below them in the role hierarchy, unless forecast sharing is enabled.
" When a custom object is on the detail side of a master-detail relationship with a standard object, its organization-wide default is set to Controlled by Parent and it is not editable.
" The organization-wide default settings can't be changed from private to public for a custom object if Apex code uses the sharing entries associated with that object. For example, if Apex code retrieves the users and groups who have sharing access on a custom object Invoice__c (represented as Invoice__share in the code), you can't change the object's organization-wide sharing setting from private to public.
Question : Which users can grant sharing privileges on a given record? (Select all that apply)
A. System Administrators
B. Manager
C. Owner of the record
D. Users above the owner of the record in the role hierarchy
E. Users below the owner in the role hierarchy
1. A,B,E
2. B,C,D
3. Access Mostly Uused Products by 50000+ Subscribers
4. A,B,C
5. B,C,E
Ans : 3
Exp :
Users can manually grant other users access to certain kinds of records, including accounts, contacts, and leads. In some cases, granting access to one record includes access to all its associated records. This method of granting access is also known as a manual share. For example, if you grant another user access to an account, the user will automatically have access to all the opportunities and cases associated with that account.
To grant access to a record, you must be one of these.
" The record owner
" A user in a role above the owner in the hierarchy (if your organization's sharing settings control access through hierarchies)
" Any user granted "Full Access" to the record
" An administrator
Question : Select the features which are used to control record access.
1. Organization-wide defaults 2. Roles 3. Public Groups 4. Sharing Rules 5. Manual Sharing
1. 1,3,4
2. 3,4,5
3. Access Mostly Uused Products by 50000+ Subscribers
4. 2,3,4,5
5. 1, 2,3,4,5
Ans : 5 Exp : Roles and profiles : The security of the system depends on how the data is shared with the users and how to prevent access to the unauthorized user. Roles and profiles together determine how the data is accessed by the actors in the system. The role determines what data the user can accesses, while the profile determines all things the user can do with the data.
Understanding profiles : A profile contains information on what the user should see and what he can do in the force.com application. The profiles control the following things: o What apps the user can see o What tabs the users are permitted to use o What objects can the user operate on and what CRUD-level permission is
given to them o The profile also determines the default RecordType and the default page layout available for the user o Fields can be enabled or restricted for the profile o What Apex class and Visualforce codes are accessible for the user o The profile also determines the hours in which the user logs in as well as the
IP restriction o What all system-level configurations are the users permitted to change is also controlled by the profile Assigning roles Roles are created according to the corporate hierarchy of the system. Roles determine how the data is shared with the user. While profiles determine what objects can be
seen by which users, roles determine which records from the object can be seen by the user. The user can be separated on the basis of their work department, territory, or company hierarchy.
As seen in the diagram A, B, C, and D are records of the same objects owned by Rep1, Rep2, Rep3, and Rep4 respectively. While all the four reps have access to the
same objects, they do not have access to each other's records. Manager 1 can see the data and reports from Rep1 and Rep2 as they come under his hierarchy. He cannot, however, access the data for Rep3 and Rep4. The Super Manager can see the entire organizations data as he is topmost in the hierarchy. Role hierarchy prevents the data being seen by people at the same level in the hierarchy, at the same time it grants full access to the people on top of the hierarchy. In the above example, Manager 1 will get all access to the Rep1 data.
Organization-Wide defaults : While roles and profiles are used to determine the user-based security, the organization wide default determines the distribution of data with the user. We use the defaults in the object to determine which people across the role hierarchy can access which objects. Objects allowed to be viewed by the organization wide defaults can be restricted using profiles and roles. The following options determine the sharing settings of the object: Private The role hierarchy is observed and people cannot view their peer records. In the figure above, Rep1 cannot see the data for Rep2 in the object that has private settings
Public Read Only This is useful if we have master data that the people refer to for example, the books info in the library. They can be kept public read only. In this case everyone across the hierarchy can see the data Publix Read/ Write This option does not obey any role hierarchy and anyone can edit/ modify or even delete the objects depending on their profile permissions.
Organization-wide default summarized : To set up organization-wide defaults follow the simple method: o First find out which user requires least access to an object. Set the organization-wide default to all the objects based on this user. For example, the library clerk is the person in a library who mostly handles the issuing and the return of the books. He needs the least access on the customer object (assuming that only the librarian can handle membership) set the customer
object to private read only. o Most restrictive record access is defined using a organization-wide default. Access to additional records is made available through the role hierarchy, sharing rules, and manual sharing. o Changing organization-wide default settings can delete manual sharing if that sharing is no longer needed.
Sharing rules : Sharing rules are the special sets of privileges set by the administrator to automatically grant record access to certain users or the group of users. There is a limit of 100 owner-based sharing rules. Sharing rules can allow the records for the user, which are restricted by the roles. However, if the object is not visible to the user profile, the records cannot be made visible by sharing rules. Sharing rules are one-off sharing options for complex sharing logic that cannot fit in the normal sharing structure.
Manual sharing : Finally, the last option in sharing is the manual sharing option given to the individual users with full access to a record. It is used if the organization wide defaults access for the object is set to Private. This is generally done by a record owner, for a single record. Only the record owner and users above the owner in the role hierarchy are granted full access to the record. It is not possible to grant other users full access. Users with the Modify All object-level permission for the given object or the Modify All Data permission can also manually share a record. User-managed sharing is removed when the record owner changes or when the access granted in the sharing does not grant additional access beyond the object's organization-wide sharing default access level.
Question : Use profiles to assign the most restrictive access settings Use Permission sets to grant additional permissions.
1. True
2. False
Ans : 1
Exp : Roles and profiles
The security of the system depends on how the data is shared with the users
and how to prevent access to the unauthorized user. Roles and profiles together
determine how the data is accessed by the actors in the system.
The role determines what data the user can accesses, while the profile determines all
things the user can do with the data.
Understanding profiles
A profile contains information on what the user should see and what he can do in
the force.com application. The profiles control the following things:
o What apps the user can see
o What tabs the users are permitted to use
o What objects can the user operate on and what CRUD-level permission is
given to them
o The profile also determines the default RecordType and the default page
layout available for the user
o Fields can be enabled or restricted for the profile
o What Apex class and Visualforce codes are accessible for the user
o The profile also determines the hours in which the user logs in as well as the
IP restriction
o What all system-level configurations are the users permitted to change is also
controlled by the profile
Question : How many permission sets can you have in an organization?
1. 1
2. 10
3. Access Mostly Uused Products by 50000+ Subscribers
4. 1000
Ans : 4
Exp : A permission set is a collection of settings and permissions that give users access to various tools and functions. The settings and permissions in permission sets are also found in profiles, but permission sets extend users' functional access without changing their profiles. For example, to give users access to a custom object, create a permission set, enable the required permissions for the object, and assign the permission set to the users. You never have to change profiles, or create a profile for a single use case. While users can have only one profile, they can have multiple permission sets.
Permission sets include settings for:
" Assigned apps
" Object settings, which include:
o Tab settings
o Record type settings
o Object permissions
o Field permissions
" App permissions
" Apex class access
" Visualforce page access
" System permissions
" Service providers (only if you've enabled Salesforce as an identity provider)
" External data source access
" Custom permissions
Question : What are the permissions that allow a system administrator to manage an application?
1. View All Data
2. Read
3. Access Mostly Uused Products by 50000+ Subscribers
4. Modify All Data
5. Edit All Data
Ans : 1
Exp : Salesforce administrators are Salesforce users who work at your organization but have additional system administration duties. Administrators are responsible for setting up Salesforce for their organizations and making sure it runs smoothly. They are assigned the System Administrator permissions profile, so they can add and configure users and aid user productivity by customizing Salesforce with custom objects, workflows, validation rules, reports, and more.
All organizations have at least one administrator, but larger ones may have more. Your administrator's role can be as simple or as complex as your company's size and structure. In smaller organizations, the administrator might be someone who also uses Salesforce the way other users do: to sell products or provide customer service, for example.
There are many Salesforce features and items that you can modify yourself to suit your own needs. But in some cases, you might want to work with your administrator to help you get the most out ofSalesforce. Here are a few examples.
" You can't find or use a tab, field, or feature you heard about during training.
" You need a custom workflow to find out when a case is closed.
" You need a custom approval process to sign off on employee expenses.
" You need help creating a custom report for your sales region.
" You need a user permission that's not granted as part of your user profile.
" You have questions about your own or others' access to records.
" You get an error message that tells you to contact your administrator for help or more information.
How you contact your administrator, and under what circumstances, depends on your company's internal business policies and practices.
Question : Standard Profiles can be customized to fit your organization's requirements.
1. True
2. False
Ans : 2
Exp :Every organization includes standard profiles. In Enterprise, Unlimited, Performance, and Developer Edition, you can use standard profiles or create, edit, and delete custom profiles. In organizations where you can't create custom profiles (such as Contact Manager, Group, and Professional Edition), you can assign standard profiles to your users, but you can't view or edit them.
Question : Identify all statements that are true:
A. If you remove access to an app from a profiles, the users in that profile will still be able to see the tabs in that application.
B. If you hide a tab from a profile, the users in that profile will not be able to see records for that object.
C. If you have 2 records types for an object, you need to have 2 page layouts for that object.
D. If a user does not have access to a specific record type, they will still be
1. A,B
2. A,B,C
3. Access Mostly Uused Products by 50000+ Subscribers
4. A,C
5. C,D
Ans : 3
Question : A field hidden by field-level security is still visible through the API.
1. True
2. False
Ans : 2
Exp :
Use field-level security to control the access that users have to certain fields. Additionally, use page layouts to control the layout and organization of detail and edit pages in Salesforce, the Self-Service Portal, and the Salesforce Customer Portal. Customize search layouts to change which fields display in search results and the buttons that display on list views.
Important
While you can use page layouts to hide fields from detail and edit pages, be aware that users may still be able to access those fields by other means, including reports, search results, list views, and the API. Use field-level security to restrict all means of accessing a field. Field-level security doesn't prevent searching on the values in a field. When search terms match on field values protected by field-level security, the associated records are returned in the search results without the protected fields and their values.
Field-Level Security
" Restrict users' access to view and edit fields by any means, including reports, search results, list views, related lists, email and mail merge templates, custom links, Connect Offline, the API, and when synchronizing data or importing personal data.
" Override any less-restrictive field access settings in page layouts and mini page layouts.
For example, if a field is required in the page layout and read only in the field-level security settings, the field-level security overrides the page layout and the field will be read only for the user.
" Override less-restrictive field settings in search layouts.
For example, if a field is visible in the search layout but hidden for certain users via the field-level security settings, the field-level security overrides the search layout and the field will be hidden for those users.
Question : What can you use to limit available picklist options?

1. Page Layouts
2. Record Types
3. Access Mostly Uused Products by 50000+ Subscribers
4. Profiles
Ans : 2
Exp : To customize the values in record type or business process picklists:
1. Select a record type and click Edit next to one of the picklist fields to customize the values included for the record type.
Or, select a business process to customize the values included in that business process.
2. Add any values from the Available Values box or remove any values from the Selected Values box. Users will be able to choose from the list of selected values when creating and editing records.
3. Access Mostly Uused Products by 50000+ Subscribers
4. Click Save.
Tips for Editing Picklists and Record Types
" The master picklist is independent of all record types and business processes. If you add a picklist value to the master picklist, you must manually include the new value in the appropriate record types. If you remove a picklist value from the master, it is no longer available when creating new records, but records assigned to that value are unchanged.
" Renaming a record type doesn't change the list of values included in it.
" The following special picklist fields are not available for record types because they are used exclusively for sales processes, lead processes, support processes, and solution processes:
o Opportunity Stage
o Case Status
o Solution Status
o Lead Status
You can use these fields to provide different picklist values for different record types by assigning a different process to each record type.
" The following campaign member picklists are not available for record types:
o Status
o Salutation
o Lead Source
" After creating record types, add the Record Type field to your page layouts if you would like the field displayed on record detail and edit pages. A user can be associated with several record types. For example, a user who creates marketing campaigns for both US and European divisions can have both US and European campaign record types available when creating new campaigns.
Record types can only be assigned to campaign members using the Campaign Member Type field on new or existing campaigns. To assign record types to campaign members, add the Campaign Member Type field to the campaign page layout. You must have the Marketing User user permission to change the campaign member type. You can also add a read-onlyCampaign Member Type field to the campaign members page layout.
Question : While filling out positions, the hiring manager wants to view job responsibilities and job description
at the top of the page; The recruiter wants to view the name of the hiring manager and the status
at the top. Which tool would you use to meet this requirement?
1. Record Types
2. Field Level Security
3. Access Mostly Uused Products by 50000+ Subscribers
Ans : 3
Exp : Page Layouts
" Control the layout and organization of detail and edit pages.
" Control which fields, related lists, and custom links users see, on detail and edit pages only.
" Control which standard and custom buttons display on detail pages and related lists.
" Determine whether fields are visible, read only, or required, on detail and edit pages only.
" In Personal, Contact Manager, Group, and Professional Editions, control which fields users can access in related lists, list views, reports, Connect Offline, email and mail merge templates, custom links, and when synchronizing data or importing personal data.
" In Professional, Enterprise, Unlimited, Performance, and Developer Editions, determine some aspects of mini page layouts, including record type and profile associations, related lists, fields, and field access settings. The visible fields and related lists of the mini page layout can be further customized, but the other items inherited from the associated page layout cannot be changed on the mini page layout itself. Mini page layouts display selected fields and related lists of records in the mini view of the console.
" Should not be used to secure data. For example, removing the Edit button from a page layout doesn't prevent users from using inline editing to modify records. To prevent users from editing data, use any combination of sharing rules, field-level security, page layout field properties, validation rules, object permissions, and Visualforce pages.
Question : When creating technical positions, the hiring manager must fill out the certification requirements for the position.
When creating non-technical positions, such as positions in Sales and Finance, the certification fields are not required and therefore
must not be visible. Which tool would you use to meet the requirements?
1. Record types
2. Field-level security
3. Access Mostly Uused Products by 50000+ Subscribers
4. Page Layouts with Record Types
Ans : 4
Exp : Page Layouts
" Control the layout and organization of detail and edit pages.
" Control which fields, related lists, and custom links users see, on detail and edit pages only.
" Control which standard and custom buttons display on detail pages and related lists.
" Determine whether fields are visible, read only, or required, on detail and edit pages only.
" In Personal, Contact Manager, Group, and Professional Editions, control which fields users can access in related lists, list views, reports, Connect Offline, email and mail merge templates, custom links, and when synchronizing data or importing personal data.
" In Professional, Enterprise, Unlimited, Performance, and Developer Editions, determine some aspects of mini page layouts, including record type and profile associations, related lists, fields, and field access settings. The visible fields and related lists of the mini page layout can be further customized, but the other items inherited from the associated page layout cannot be changed on the mini page layout itself. Mini page layouts display selected fields and related lists of records in the mini view of the console.
" Should not be used to secure data. For example, removing the Edit button from a page layout doesn't prevent users from using inline editing to modify records. To prevent users from editing data, use any combination of sharing rules, field-level security, page layout field properties, validation rules, object permissions, and Visualforce pages.
In the enhanced profile user interface, Record Types and Page Layout Assignments settings determine the record type and page layout assignment mappings that are used when users view records. They also determine which record types are available when users create or edit records.
To specify record types and page layout assignments:
1. From Setup, click Manage Users | Profiles.
2. Select a profile.
3. Access Mostly Uused Products by 50000+ Subscribers
4. Click Edit.
5. In the Record Types and Page Layout Assignments section, make changes to the settings as needed.
Setting Description
Record Types Lists all existing record types for the object.
--Master-- is a system-generated record type that's used when a record has no custom record type associated with it. When --Master-- is assigned, users can't set a record type to a record, such as during record creation. All other record types are custom record types.
Question : Interviewers should never be able to view a candidate's social security number. Which tool would
you use to meet this requirement?
1. Record types
2. Field-level security
3. Access Mostly Uused Products by 50000+ Subscribers
4. Page Layouts with Record Types
Ans : 2
Exp : Field-level security settings let administrators restrict users' access to view and edit specific fields in:
" Detail and edit pages
" Related lists
" List views
" Reports
" Connect Offline
" Email and mail merge templates
" Custom links
" The partner portal
" The Salesforce Customer Portal
" Synchronized data
" Imported data
The fields that users see on detail and edit pages are a combination of page layouts and field-level security settings. The most restrictive field access settings of the two always apply. For example, if a field is required in the page layout and read-only in the field-level security settings, the field-level security overrides the page layout and the field will be read-only for the user.
Important
Field-level security doesn't prevent searching on the values in a field. When search terms match on field values protected by field-level security, the associated records are returned in the search results without the protected fields and their values.
Use field-level security as the means to restrict users' access to fields; then use page layouts primarily to organize detail and edit pages within tabs. This reduces the number of page layouts for you to maintain.
Roll-up summary and formula fields are always read-only on detail pages and not available on edit pages. They may also be visible to users even though they reference fields that your users cannot see. Universally required fields always display on edit pages regardless of field-level security.
The relationship group wizard allows you to create and edit relationship groups regardless of field-level security.
Question : Which feature establishes the baseline level of access a user has to records they do not own?
1. Roles
2. Organization-wide defaults
3. Access Mostly Uused Products by 50000+ Subscribers
4. Sharing Rules
Ans : 2
Exp : Organization-wide sharing settings specify the default level of access to records and can be set separately for accounts (including assets and contracts), activities, contacts, campaigns, cases, leads, opportunities, calendars, price books, and custom objects.
For most objects, organization-wide sharing settings can be set to Private, Public Read Only, or Public Read/Write. In environments where the organization-wide sharing setting for an object is Private or Public Read Only, an administrator can grant users additional access to records by setting up a role hierarchy or defining sharing rules. However, sharing rules can only be used to grant additional access-they cannot be used to restrict access to records beyond what was originally specified with the organization-wide sharing defaults.
If your organization uses a Customer Portal, before you enable contacts to access the portal, set the organization-wide sharing defaults on accounts, contacts, contracts, assets, and cases to Private. This ensures that by default your customers can view only their own data. You can still grant your Salesforce users Public Read/Write access by creating sharing rules in which all internal users share with all internal users.
By default, Salesforce uses hierarchies, like the role or territory hierarchy, to automatically grant access of records to users above the record owner in the hierarchy.
Setting an object to Private makes those records visible only to record owners and those above them in the role hierarchy. Use the Grant Access Using Hierarchies checkbox to disable access to records to users above the record owner in the hierarchy for custom objects in Professional, Enterprise, Unlimited, Performance, and Developer Edition. If you deselect this checkbox for a custom object, only the record owner and users granted access by the organization-wide defaults receive access to the records
Question : If a developer wants interviewers to view positions, but to never view the Pay Grade listed for a
position, which tool would the developer use?
1. Field-level security on positions
2. Page Layouts
3. Access Mostly Uused Products by 50000+ Subscribers
4. Record types
Ans : 1
Exp : Field-level security settings let administrators restrict users' access to view and edit specific fields in:
" Detail and edit pages
" Related lists
" List views
" Reports
" Connect Offline
" Email and mail merge templates
" Custom links
" The partner portal
" The Salesforce Customer Portal
" Synchronized data
" Imported data
The fields that users see on detail and edit pages are a combination of page layouts and field-level security settings. The most restrictive field access settings of the two always apply. For example, if a field is required in the page layout and read-only in the field-level security settings, the field-level security overrides the page layout and the field will be read-only for the user.
Important
Field-level security doesn't prevent searching on the values in a field. When search terms match on field values protected by field-level security, the associated records are returned in the search results without the protected fields and their values.
Use field-level security as the means to restrict users' access to fields; then use page layouts primarily to organize detail and edit pages within tabs. This reduces the number of page layouts for you to maintain.
Roll-up summary and formula fields are always read-only on detail pages and not available on edit pages. They may also be visible to users even though they reference fields that your users cannot see. Universally required fields always display on edit pages regardless of field-level security.
The relationship group wizard allows you to create and edit relationship groups regardless of field-level security.
Question : How can a developer restrict access to records?
1. By changing the organization-wide defaults
2. By creating manual sharing
3. Access Mostly Uused Products by 50000+ Subscribers
4. By creating a public group
Ans : 1
Exp : Organization-wide sharing settings specify the default level of access to records and can be set separately for accounts (including assets and contracts), activities, contacts, campaigns, cases, leads, opportunities, calendars, price books, and custom objects.
For most objects, organization-wide sharing settings can be set to Private, Public Read Only, or Public Read/Write. In environments where the organization-wide sharing setting for an object is Private or Public Read Only, an administrator can grant users additional access to records by setting up a role hierarchy or defining sharing rules. However, sharing rules can only be used to grant additional access-they cannot be used to restrict access to records beyond what was originally specified with the organization-wide sharing defaults.
If your organization uses a Customer Portal, before you enable contacts to access the portal, set the organization-wide sharing defaults on accounts, contacts, contracts, assets, and cases to Private. This ensures that by default your customers can view only their own data. You can still grant your Salesforce users Public Read/Write access by creating sharing rules in which all internal users share with all internal users.
By default, Salesforce uses hierarchies, like the role or territory hierarchy, to automatically grant access of records to users above the record owner in the hierarchy.
Setting an object to Private makes those records visible only to record owners and those above them in the role hierarchy. Use the Grant Access Using Hierarchies checkbox to disable access to records to users above the record owner in the hierarchy for custom objects in Professional, Enterprise, Unlimited, Performance, and Developer Edition. If you deselect this checkbox for a custom object, only the record owner and users granted access by the organization-wide defaults receive access to the records.
Question : By using ISNEW, you can ensure that hiring managers dont specify a back date as the open date on a position to increase its perceived urgency.
1. True
2. False
Ans : 1
Exp : The ISNEW function checks if a formula is running during the creation of a new record and returns TRUE if it is. If the formula is running for updating an existing record, this function returns FALSE. For example, by using ISNEW, you can ensure that hiring managers dont specify a back date as the open date on a position to increase its perceived urgency.
ISNEW
Description: Checks if the formula is running during the creation of a new record and returns TRUE if it is. If an existing record is being updated, this function returns FALSE.
Use: ISNEW()
Validation Rule Example: Use the following validation rule to prevent users from creating a record with a close date in the past.AND (ISNEW(), CloseDate is less than TODAY()) checks if the user is creating a new opportunity and, if so, ensures that the Close Date is today or after today.
Use this validation rule to ensure users add at least one product to an opportunity after they have created it.
NOT(OR(ISNEW(),HasOpportunityLineItem))
In this example, the validation rule formula displays the following error message when an existing opportunity does not have any products: "You must add products to this opportunity before saving." This does not display an error on the initial save because they cannot add products until after saving the record initially; but it prevents them from resaving or closing an opportunity that does not contain products.
Tips: " This function is available only in validation rules, field updates, workflow rules, and assignment rules.
" Use the NOT function to reverse the return values of TRUE and FALSE.
" This function always returns FALSE when used in a workflow rule with a time-based trigger.
" This function always returns FALSE when used in a field update for an approval action.
Question : Using VLOOKUP : users can check the state and zip code entered in a record against a table of states and
zip codes to ensure that the state and zip code match.
1. True
2. False
Ans : 1
Exp : The VLOOKUP function returns a value by looking up a related value in a custom object. This function checks against a key and returns a value from that key. Similar to theVLOOKUP () function in Microsoft Excel. For example, users can check the state and zip code entered in a record against a table of states and zip codes to ensure that the state and zip code match.
Exp : VLOOKUP
Description: Returns a value by looking up a related value on a custom object similar to the VLOOKUP() Excel function.
Use: VLOOKUP(field_to_return, field_on_lookup_object, lookup_value) and replace field_to_return with the field that contains the value you want returned, field_on_lookup_objectwith the field on the related object that contains the value you want to match, and lookup_value with the value you want to match.
Validation Rule Example: This example checks that a billing postal code is valid by looking up the first five characters of the value in a custom object called Zip_Code__c that contains a record for every valid zip code in the US. If the zip code is not found in the Zip_Code__c object or the billing state does not match the corresponding State_Code__c in the Zip_Code__c object, an error is displayed.
AND( LEN(BillingPostalCode) > 0, OR(BillingCountry = "USA", BillingCountry = "US"),
VLOOKUP( $ObjectType.Zip_Code__c.Fields.State_Code__c, $ObjectType.Zip_Code__c.Fields.Name, LEFT(BillingPostalCode,5)) not equal to
BillingState )
Question : Which function verifies the format of the data?

1. CASE
2. ISNEW
3. Access Mostly Uused Products by 50000+ Subscribers
4. IF
Ans : 3
Exp : REGEX
Description: Compares a text field to a regular expression and returns TRUE if there is a match. Otherwise, it returns FALSE. A regular expression is a string used to describe a format of a string according to certain syntax rules.
Use: REGEX(text, regex_text) and replace text with the text field, and regex_text with the regular expression you want to match.
Validation Rule Example: This example ensures that a custom field called SSN matches a regular expression representing a valid social security number format of the form 999-99-9999.
NOT(
OR(
LEN (SSN__c) = 0,
REGEX(SSN__c, "[0-9]{3}-[0-9]{2}-[0-9]{4}")
)
)
Tips: " Regular expression syntax is based on Java Platform SE 6 syntax. However, backslash characters (\) must be changed to double backslashes (\\) because backslash is an escape character in Salesforce.
" The Salesforce regular expression engine matches an entire string as opposed to searching for a match within a string. For example, if you are searching for the name Marc Benioff, use the regular expression, .*Marc Benioff.*, to find a match in a string like the following:
According to Marc Benioff, the social enterprise increases customer success.
If you use the regular expression, Marc Benioff, the only string that this regular expression will match is:
Marc Benioff
" Capture groups and substitutions are ignored.
" This function is available everywhere formulas exist except formula fields and custom buttons and links.
Question : Which of the following statements are true?
A. The ISCHANGED function compares the value of a field with its previous value and returns TRUE if the values are different. If the values are the same, this function returns FALSE.
B. The ISNUMBER function determines if a text value is a number and returns TRUE if it is; otherwise, it returns FALSE.
C. The ISNEW function compares a text field to a regular expression
1. A
2. A,B
3. Access Mostly Uused Products by 50000+ Subscribers
4. B,C
5. A,C
Ans : 2 Exp : ISCHANGED Description: Compares the value of a field to the previous value and returns TRUE if the values are different. If the values are the same, this function returns FALSE. Use: ISCHANGED(field) and replace field with the name of the field you want to compare. Validation Rule Example: The following validation rule prevents users from changing an object name after it has been created:NOT(ISCHANGED(Name)). NOT(AND(ISCHANGED(Priority), ISPICKVAL(Priority, "Low"))) is a validation rule that ensures if a user changes the Priority of a case, the new priority cannot be "Low." NOT(AND(ISCHANGED(CloseDate), OR(MONTH(CloseDate) ne MONTH(TODAY()), YEAR(CloseDate) ne YEAR(TODAY())),$Profile.Name ne "Sales Manager"))is a validation rule that prevents a user from changing the Close Date of an opportunity to a date outside of the current month and year unless that user has the "Sales Manager" profile. Note : $Profile merge fields are only available in Enterprise, Unlimited, Performance, and Developer Editions.
Tips: " This function is available only in: o Assignment rules o Validation rules o Field updates o Workflow rules if the evaluation criteria is set to Evaluate the rule when a record is: created, and every time it's edited. " Use the NOT function to reverse the return values of TRUE and FALSE. " This function returns FALSE when evaluating any field on a newly created record. " If a text field was previously blank, this function returns TRUE when it contains any value. " For number, percent, or currency fields, this function returns TRUE when: o The field was blank and now contains any value o The field was zero and now is blank o The field was zero and now contains any other value ISNUMBER Description: Determines if a text value is a number and returns TRUE if it is. Otherwise, it returns FALSE. Use: ISNUMBER(text) and replace text with the merge field name for the text field. Validation Rule Example: OR(LEN(Bank_Account_Number__c) ne 10, NOT(ISNUMBER(Bank_Account_Number__c))) This validation rule ensures a custom text field called Bank Account Number is a number of 10 digits and is not blank. Tips: " This function returns FALSE for blank values. " The ISNUMBER function is not aware of your locale. For example, ISNUMBER("123,12")and ISNUMBER("1 000") return FALSE even if the user's locale is "French." " Chinese, Japanese, Korean, and special characters including a space return FALSE. " The ISNUMBER function returns TRUE for scientific formatting such as "2E2" or "123.123." ISPICKVAL Description: Determines if the value of a picklist field is equal to a text literal you specify. Use: ISPICKVAL(picklist_field, text_literal) and replace picklist_field with the merge field name for the picklist; replace text_literal with the picklist value in quotes. text_literal cannot be a merge field or the result of a function. Examples: Contract Activation IF(ISPICKVAL(Status, "Activated"), NOW()-ActivatedDate, null) calculates the number of days since the contract was activated. If the contract status is not "Activated," this field is blank. Commission Amounts
IF(ISPICKVAL(StageName, "Closed Won"),
ROUND(Amount *0.02, 2), 0)
This example calculates the commission amount for any opportunity that has a "Closed Won" stage. The value of this field will be the amount times 0.02 for any closed/won opportunity. Open or lost opportunities will have a zero commission value. Competitor-Triggered Workflow
ISPICKVAL(Stage, "Closed Lost") && INCLUDES(Competitor__c, "Acme")
This formula in a workflow rule configures Salesforce to trigger the associated workflow actions if theCompetitor multi-select picklist field on a lost business is Acme. Tips: " Replace picklist_field with a custom or standard field of type picklist. " Your text_literal expression must be of type text and enclosed in quotes. It cannot be a merge field or the result of a function. " Use CASE functions to determine if a picklist value is equal to a particular value.
" When using the ISPICKVAL function to return the previous value of a picklist field, include the PRIORVALUE function inside the ISPICKVAL function as in this example:
" ISPICKVAL(PRIORVALUE
" (picklist_field),
text_literal)
JSENCODE Description: Encodes text and merge field values for use in JavaScript by inserting escape characters, such as a backslash (\), before unsafe JavaScript characters, such as the apostrophe ('). Use: {!JSENCODE(text)} and replace text with the merge field or text string that contains the unsafe JavaScript characters. Example: If the merge field foo__c contains (B>Enter the user's name(b>,{!JSENCODE(foo__c)} results in: \u003CB\u003EEnter the user\'s name\u003C\/b\u003E Tips: This function is only available in custom buttons and links.
Question : The Developer Console is a collection of tools that you can use to analyze and troubleshoot applications in your Salesforce organization.
You can not use the Developer Console fora variety of administrative and development tasks which include general debugging and troubleshooting,
source code editing, and performance validation.
1. True
2. False
Ans : 2
Exp : The Developer Console is an integrated development environment with a collection of tools you can use to create, debug, and test applications in your Salesforce organization.
The Developer Console can help with many of your development tasks:
Debugging and Troubleshooting
The Developer Console provides a convenient set of tools for efficiently tracking down logical issues.
" View Logs: Use the Logs tab to view a list of logs. Open logs in the Log Inspector. Log Inspector is a context-sensitive execution viewer that shows the source of an operation, what triggered the operation, and what occurred afterward. Use this tool to inspect debug logs that include database events, Apex processing, workflow, and validation logic.
" Set and View Checkpoints in Apex Code: Use the Developer Console to set checkpoints to identify the source of errors. For example, if you want to understand why a certain request generates an error, you can review the execution, identify the offending logic, and set a checkpoint. When you execute the process again, you can inspect the request at that specific point to understand in detail how to improve your code. While the Developer Console can't pause execution like a traditional debugger, it provides cloud developers much of the same visibility, and reduces the need to instrument code with System.debug commands.
Editing and Navigating Source Code
The Developer Console allows you to browse, open, edit and create source code files.
" Browse Packages in Your Organization: Navigate the contents of packages created in your organization.
" View and Edit Apex Classes and Triggers: Open and edit Apex triggers and classes, and open a read-only view of your custom object definitions.
" View and Edit Lightning Components: Open and edit Lightning resources, such as an application, component, event, or interface.
" View and Edit Visualforce Pages and Components: Open and edit Visualforce pages and components.
" Use the Source Code Editor: Open a working set of code files and switch between them with a single click. The Developer ConsoleSource Code Editor includes an auto-complete feature for Apex code.
Testing and Validating Performance
The Developer Console has a number of features dedicated to testing code and analyzing performance.
" Test Apex Code: Use the Developer Console to check code coverage and run Apex tests, including unit tests, functional tests, regression tests, and so on. To facilitate the development of robust, error-free code, Apex supports the creation and execution of unit tests. Unit tests are class methods that verify whether a particular piece of code is working properly. Unit test methods take no arguments, commit no data to the database, send no emails, and are flagged with the testMethod keyword or the isTestannotation in the method definition. Also, test methods must be defined in test classes, that is, classes annotated with isTest.
" Inspect Logs for Performance Issues: Log Inspector is a context-sensitive execution viewer that shows the source of an operation, what triggered the operation, and what occurred afterward. Use this tool to inspect debug logs that include database events, Apexprocessing, workflow, and validation logic. Open a debug log and view the aggregated performance of an operation in the Performance Tree. The Executed Units panel breaks up the request both by time and type, and categorizes the timings by methods, queries, workflows, callouts, DML, validations, triggers, and pages, giving you a clear idea of where to find performance issues. Use the Timeline panel to see a timeline view of the overall request and walk through the events for a given block. The Limits panel provides a summary view of resources used and maps them against your allocated request limits.
Executing SOQL and SOSL Queries
The Developer Console provides a simple interface for managing SOQL and SOSL queries.
" Edit and Execute SOQL and SOSL Queries: Use the Query Editor to query data from your organization.
" View Query Results: Results are displayed in a Query Results grid that allows you to open, create, update, and delete records. In SOSL search results with multiple objects, each object is displayed on a separate tab.
Question : How many Debug logs can be retained for an organization?
1. 2
2. 20
3. Access Mostly Uused Products by 50000+ Subscribers
4. 2000
Ans : 2
Exp : You can retain and manage the debug logs for specific users.
The following are the limits for debug logs:
" Once a user is added, that user can record up to 20 debug logs. After a user reaches this limit, debug logs stop being recorded for that user. Click Reset on the Monitoring Debug logs page to reset the number of logs for that user back to 20. Any existing logs are not overwritten.
" Each debug log can only be 2 MB. Debug logs that are larger than 2 MB are reduced in size by removing older log lines, such as log lines for earlier System.debug statements. The log lines can be removed from any location, not just the start of the debug log.
" Each organization can retain up to 50 MB of debug logs. Once your organization has reached 50 MB of debug logs, the oldest debug logs start being overwritten.
Question Select the situations where you might use the Developer Console or the Debug log to troubleshoot automated actions.
1. A workflow field update doesn't seem to be taking place
2. The field update may be working, but an Apex trigger may be overwriting the update
3. Access Mostly Uused Products by 50000+ Subscribers
4. 1 and 3
5. All 1,2 and 3 are correct
Ans : 5
Exp : situations where you might use the Developer Console : A workflow field update doesn't seem to be taking place: The field update may be working, but an Apex trigger may be overwriting the update. A record submitted for approval is not routed to the expected user: If there are multiple approval processes on a single object, users' record may be meeting the criteria for both, and the order may need to be changed.
Exp : The Developer Console is an integrated development environment with a collection of tools you can use to create, debug, and test applications in your Salesforce organization.
The Developer Console can help with many of your development tasks:
Debugging and Troubleshooting
The Developer Console provides a convenient set of tools for efficiently tracking down logical issues.
" View Logs: Use the Logs tab to view a list of logs. Open logs in the Log Inspector. Log Inspector is a context-sensitive execution viewer that shows the source of an operation, what triggered the operation, and what occurred afterward. Use this tool to inspect debug logs that include database events, Apex processing, workflow, and validation logic.
" Set and View Checkpoints in Apex Code: Use the Developer Console to set checkpoints to identify the source of errors. For example, if you want to understand why a certain request generates an error, you can review the execution, identify the offending logic, and set a checkpoint. When you execute the process again, you can inspect the request at that specific point to understand in detail how to improve your code. While the Developer Console can't pause execution like a traditional debugger, it provides cloud developers much of the same visibility, and reduces the need to instrument code with System.debug commands.
Editing and Navigating Source Code
The Developer Console allows you to browse, open, edit and create source code files.
" Browse Packages in Your Organization: Navigate the contents of packages created in your organization.
" View and Edit Apex Classes and Triggers: Open and edit Apex triggers and classes, and open a read-only view of your custom object definitions.
" View and Edit Lightning Components: Open and edit Lightning resources, such as an application, component, event, or interface.
" View and Edit Visualforce Pages and Components: Open and edit Visualforce pages and components.
" Use the Source Code Editor: Open a working set of code files and switch between them with a single click. The Developer ConsoleSource Code Editor includes an auto-complete feature for Apex code.
Testing and Validating Performance
The Developer Console has a number of features dedicated to testing code and analyzing performance.
" Test Apex Code: Use the Developer Console to check code coverage and run Apex tests, including unit tests, functional tests, regression tests, and so on. To facilitate the development of robust, error-free code, Apex supports the creation and execution of unit tests. Unit tests are class methods that verify whether a particular piece of code is working properly. Unit test methods take no arguments, commit no data to the database, send no emails, and are flagged with the testMethod keyword or the isTestannotation in the method definition. Also, test methods must be defined in test classes, that is, classes annotated with isTest.
" Inspect Logs for Performance Issues: Log Inspector is a context-sensitive execution viewer that shows the source of an operation, what triggered the operation, and what occurred afterward. Use this tool to inspect debug logs that include database events, Apexprocessing, workflow, and validation logic. Open a debug log and view the aggregated performance of an operation in the Performance Tree. The Executed Units panel breaks up the request both by time and type, and categorizes the timings by methods, queries, workflows, callouts, DML, validations, triggers, and pages, giving you a clear idea of where to find performance issues. Use the Timeline panel to see a timeline view of the overall request and walk through the events for a given block. The Limits panel provides a summary view of resources used and maps them against your allocated request limits.
Executing SOQL and SOSL Queries
The Developer Console provides a simple interface for managing SOQL and SOSL queries.
" Edit and Execute SOQL and SOSL Queries: Use the Query Editor to query data from your organization.
View Query Results: Results are displayed in a Query Results grid that allows you to open, create, update, and delete records. In SOSL search results with multiple objects, each object is displayed on a separate tab.
Question : Which of the following actions are tracked in debug logs? (Select all that apply.)
A. Database changes
B. Manual workflow processes
C. Request-response HTML
D. Resources used by an Apex script
1. A,B,C
2. A,B,D
3. Access Mostly Uused Products by 50000+ Subscribers
4. B,C
5. C,D
Ans : 3
Exp : A debug log can record database operations, system processes, and errors that occur when executing a transaction or running unit tests. Debug logs can contain information about:
" Database changes
" HTTP callouts
" Apex errors
" Resources used by Apex
" Automated workflow processes, such as:
o Workflow rules
o Assignment rules
o Approval processes
o Validation rules
The system generates a debug log every time a transaction that is included in the defined filter criteria is executed.
Transactions can be generated from the following:
" Salesforce user interface
" API
" executeanonymous calls
" Web services
" Email services
The filter criteria set for the user, the Developer Console or the API header determines what is included in the debug log.
Note
Debug logs don't include transactions that are triggered by lead conversion. For example, suppose a converted lead triggers a workflow rule. The debug log won't show that this workflow rule fired.
The following are examples of when to use a debug log:
" As a developer creating a custom application, you can use the debug log to validate the application's behavior. For example, you can set the debug log filter to check for callouts, then in the debug log, view information about the success and duration of those callouts.
" As an administrator for an organization, you can use the debug log to troubleshoot when a user reports difficulties. You can monitor the debug logs for the user while they step through the related transaction, then use the debug log to view the system details
Question : Postal/Zip Codes : would be a use case for validation rules utilizing REGEX formula function to enforce data format
1. True
2. False
Ans : 1
Exp : The Formula Resource
The Formula resource calculates a numeric, text, date, date/time, currency, or boolean value using functions and elements in your flow. Consider the following when creating a Formula resource.
" Any formula that doesn't return a value that matches its data type or that contains an unsupported function returns null. For example, if your formula is of data type of Number, the output must be numeric.
" If you include an invalid formula resource in a Display Text screen field, the formula result is displayed to the user as an empty string.
" You can't activate a flow that contains an invalid formula.
Formulas for Validating Flow User Input
You can use a formula to validate flow user input by selecting Validate when configuring an input field on a Screen element.
" The formula expression must return a Boolean value.
" If the formula statement evaluates to TRUE, the input is valid. If the formula statement evaluates to FALSE, the error message is displayed to the user.
" If the user leaves the field blank, and the field is not required, no validation is performed.
Examples of formulas for validating flow user input:
" Validate the format of an email address:
REGEX({!Email_Address},"[a-zA-Z0-9._%+-]+@[a-zA-Z0-9.-]+\\.[a-zA-Z]{2,4}")
" Validate the format of a zip code:
REGEX({!Zipcode},"\\d{5}(-\\d{4})?")
Question : Validation rules in conjunction with a roll-up summary field can be used to prevent users from adding or deleting records.
1. True
2. False
Ans : 1
Exp : Validation rules in conjunction with a roll-up summary field can be used to prevent users from adding or deleting records. To create a validation rule: 1. Build a roll-up summary on the parent object that sums the number of child records. 2. Create a validation rule on the parent object that conditionally prevents changes to the number listed in the roll-up summary field. If a user tries to add or delete a record, the validation rule prevents the user from doing that.
Validation Rule Considerations : Available in: Contact Manager, Group, Professional, Enterprise, Performance, Unlimited, Developer, and Database.com Editions
Validation rules verify that the data a user enters in a record meets the standards you specify before the user can save the record. A validation rule can contain a formula or expression that evaluates the data in one or more fields and returns a value of "True" or "False". Validation rules also include an error message to display to the user when the rule returns a value of "True" due to an invalid value. Review these considerations before implementing validation rules in your organization.
How Salesforce Processes Validation Rules
Salesforce processes rules in the following order:
1. Validation rules 2. Assignment rules 3. Auto-response rules 4. Workflow rules (with immediate actions) 5. Escalation rules
In addition:
" When one validation rule fails, Salesforce continues to check any additional validation rules on that field or any other field on the page and displays all appropriate error messages at once.
" If validation rules exist for activities and you create an activity during lead conversion, the lead converts but a task isn't created.
" Validation rules are only enforced during lead conversion if validation and triggers for lead conversion are enabled in your organization.
" Campaign hierarchies ignore validation rules.
" Salesforce runs validation rules before creating records submitted via Web-to-Lead and Web-to-Case, and only creates records that have valid values.
" Validation rules continue to run on individual records if the owner is changed. If the Mass Transfer tool is used to change the ownership of multiple records, however, validation rules won't run on those records.
Validation Rule Field Restrictions : Validation rule formulas don't or can't refer to:
" Compound fields, including addresses, first and last names, and dependent picklists and lookups
" Campaign statistic fields, including statistics for individual campaigns and campaign hierarchies
" Merge fields for auto-number or compound address fields such as Mailing Address
Note : Merge fields for individual address fields, such as Billing City, are OK to use in validation rule formulas.
In addition, validation rules behave like this with regard to other fields and functions in Salesforce:
" The detail page of a custom activity field doesn't list associated validation rules.
" Because updates to records based on workflow rules don't trigger validation rules, workflow rules can invalidate previously valid fields.
" You can't create validation rules for relationship group members.
" Because roll-up summary fields aren't displayed on edit pages, you can use them in validation rules, but not as the error location.
Lookup Filters vs. Validation Rules
Validation rules and lookup filters achieve similar ends, but offer different advantages. Use a lookup filter if:
" You want to improve user efficiency by limiting the number of available options in a lookup search dialog.
" You want to improve user efficiency by automating filters on lookup search dialogs that your users manually set.
Use a validation rule if: " You're close to the maximum number of lookup filters allowed.
" You must implement a complex business rule that requires you to use a formula. Formulas can reference fields that basic filter criteria can't reference, such as fields on the parent of the source object. Formulas can also use functions. For example, use ISNEW if the rule should only apply on record creation, or ISCHANGED if the rule should apply when a field changes.
Question : When are validation rules applied?
1. When a user saves a record.
2. When a user views a record.
3. Access Mostly Uused Products by 50000+ Subscribers
4. When a user reports on a record.
Ans : 1
Exp : Validation rules verify that the data a user enters in a record meets the standards you specify before the user can save the record. A validation rule can contain a formula or expression that evaluates the data in one or more fields and returns a value of "True" or "False". Validation rules also include an error message to display to the user when the rule returns a value of "True" due to an invalid value. Review these considerations before implementing validation rules in your organization.
Question : When setting up a validation rule, you must write the error condition formula and
the_____________
1. Error message
2. Success message
3. Access Mostly Uused Products by 50000+ Subscribers
4. 1 and 3
5. 1,2 and 3 are correct
Ans : 1
Exp : Validation rules verify that the data a user enters in a record meets the standards you specify before the user can save the record. A validation rule can contain a formula or expression that evaluates the data in one or more fields and returns a value of "True" or "False". Validation rules also include an error message to display to the user when the rule returns a value of "True" due to an invalid value. Review these considerations before implementing validation rules in your organization.
How Salesforce Processes Validation Rules
Salesforce processes rules in the following order: 1. Validation rules 2. Assignment rules 3. Auto-response rules 4. Workflow rules (with immediate actions)
5. Escalation rules In addition:
" When one validation rule fails, Salesforce continues to check any additional validation rules on that field or any other field on the page and displays all appropriate error messages at once. " If validation rules exist for activities and you create an activity during lead conversion, the lead converts but a task isn't created. " Validation rules are only enforced during lead conversion if validation and triggers for lead conversion are enabled in your organization.
" Campaign hierarchies ignore validation rules. " Salesforce runs validation rules before creating records submitted via Web-to-Lead and Web-to-Case, and only creates records that have valid values. " Validation rules continue to run on individual records if the owner is changed. If the Mass Transfer tool is used to change the ownership of multiple records, however, validation rules won't run on those records.
Validation Rule Field Restrictions Validation rule formulas don't or can't refer to:
" Compound fields, including addresses, first and last names, and dependent picklists and lookups
" Campaign statistic fields, including statistics for individual campaigns and campaign hierarchies
" Merge fields for auto-number or compound address fields such as Mailing Address
Note : Merge fields for individual address fields, such as Billing City, are OK to use in validation rule formulas.
In addition, validation rules behave like this with regard to other fields and functions in Salesforce:
" The detail page of a custom activity field doesn't list associated validation rules.
" Because updates to records based on workflow rules don't trigger validation rules, workflow rules can invalidate previously valid fields.
" You can't create validation rules for relationship group members.
" Because roll-up summary fields aren't displayed on edit pages, you can use them in validation rules, but not as the error location.
Lookup Filters vs. Validation Rules Validation rules and lookup filters achieve similar ends, but offer different advantages. Use a lookup filter if:
" You want to improve user efficiency by limiting the number of available options in a lookup search dialog.
" You want to improve user efficiency by automating filters on lookup search dialogs that your users manually set.
Use a validation rule if: " You're close to the maximum number of lookup filters allowed.
" You must implement a complex business rule that requires you to use a formula. Formulas can reference fields that basic filter criteria can't reference, such as fields on the parent of the source object. Formulas can also use functions. For example, use ISNEW if the rule should only apply on record creation, or ISCHANGED if the rule should apply when a field changes.
Question : When the user hits save, the record cannot be saved unless all validation rules are fulfilled.
1. True
2. False
Ans : 1
Exp : Before the user can save the record. When the user hits save, the record cannot be saved unless all validation rules are fulfilled.
Exp : Validation rules verify that the data a user enters in a record meets the standards you specify before the user can save the record. A validation rule can contain a formula or expression that evaluates the data in one or more fields and returns a value of "True" or "False". Validation rules also include an error message to display to the user when the rule returns a value of "True" due to an invalid value. Review these considerations before implementing validation rules in your organization. How Salesforce Processes Validation Rules Salesforce processes rules in the following order:
6. Validation rules 7. Assignment rules 8. Auto-response rules 9. Workflow rules (with immediate actions) 10. Escalation rules
In addition: " When one validation rule fails, Salesforce continues to check any additional validation rules on that field or any other field on the page and displays all appropriate error messages at once.
" If validation rules exist for activities and you create an activity during lead conversion, the lead converts but a task isn't created.
" Validation rules are only enforced during lead conversion if validation and triggers for lead conversion are enabled in your organization.
" Campaign hierarchies ignore validation rules.
" Salesforce runs validation rules before creating records submitted via Web-to-Lead and Web-to-Case, and only creates records that have valid values.
" Validation rules continue to run on individual records if the owner is changed. If the Mass Transfer tool is used to change the ownership of multiple records, however, validation rules won't run on those records.
Validation Rule Field Restrictions
Validation rule formulas don't or can't refer to:
" Compound fields, including addresses, first and last names, and dependent picklists and lookups
" Campaign statistic fields, including statistics for individual campaigns and campaign hierarchies
" Merge fields for auto-number or compound address fields such as Mailing Address
Note : Merge fields for individual address fields, such as Billing City, are OK to use in validation rule formulas.
In addition, validation rules behave like this with regard to other fields and functions in Salesforce:
" The detail page of a custom activity field doesn't list associated validation rules.
" Because updates to records based on workflow rules don't trigger validation rules, workflow rules can invalidate previously valid fields.
" You can't create validation rules for relationship group members.
" Because roll-up summary fields aren't displayed on edit pages, you can use them in validation rules, but not as the error location.
Lookup Filters vs. Validation Rules : Validation rules and lookup filters achieve similar ends, but offer different advantages. Use a lookup filter if:
" You want to improve user efficiency by limiting the number of available options in a lookup search dialog.
" You want to improve user efficiency by automating filters on lookup search dialogs that your users manually set.
Use a validation rule if: " You're close to the maximum number of lookup filters allowed.
You must implement a complex business rule that requires you to use a formula. Formulas can reference fields that basic filter criteria can't reference, such as fields on the parent of the source object. Formulas can also use functions. For example, use ISNEW if the rule should only apply on record creation, or ISCHANGED if the rule should apply when a field changes.
Question : Identify the features of a workflow rule. (Select all that apply.)
A. It triggers an action when a record meets the criteria for the rule.
B. It can trigger only immediate actions.
C. It is evaluated before the rule is created.
D. It can be triggered on import of data.
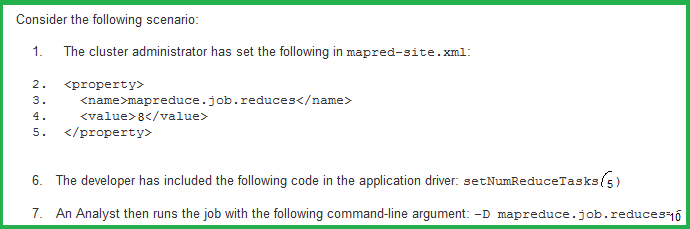
1. A,E
2. A,D
3. Access Mostly Uused Products by 50000+ Subscribers
4. B,D
5. C,D
Correct Answer : Get Lastest Questions and Answer :
Explanation: Workflow rule
Automate your organization's standard processes by configuring workflow rules.
If you plan on configuring workflow rules that have time-dependent actions, specify a default workflow user. Salesforce associates the default workflow user with a workflow rule if the user who initiated the rule is no longer active.
To get started using workflow rules, from Setup, click Create | Workflow and Approvals | Workflow Rules. From this page, you can:
" Create a new workflow rule.
" Select an existing rule to view its details, clone it, activate and deactivate it, or view and edit actions and time triggers.
" Edit a workflow rule.
" Delete a workflow rule.
Note
You can't delete a workflow rule that has pending actions in the workflow queue. Wait until pending actions are processed, or use the workflow queue to cancel the pending actions.
" Activate a workflow rule. Click Deactivate to prevent the rule from firing when its conditions are met.
Note
o You can deactivate a workflow rule at any time. However, if you deactivate a rule that has pending actions,Salesforce completes those actions as long as the record that triggered the rule is not updated.
o You can't add time-dependent workflow actions to active workflow rules. Deactivate the workflow rule first, add the time-dependent workflow action, and reactivate the rule.
o When tasks are created automatically by actions such as clicking the Send An Email button, they don't trigger task-based workflow rules.
Tip
You can use the Developer Console to debug workflow rules. The Developer Console lets you view debug log details and information about workflow rules and actions, such as the name of the user who triggered the workflow rule and the name and ID of the record being evaluated.
Related Questions
Question : Multi select picklist can be dependant field only and not a controlling field
1. True
2. False
Question : External id can be created for field of type text, number or email.
1. True
2. False
Question : . What are the different ways a flow can be deployed? (Select all that apply.)
A. Custom button
B. Custom link
C. Visualforce page
D. Apex trigger
E. Field Updates
F. Custom actions
1. A,B,C
2. B,C,E
3. C,D,E
4. D,E,F
5. A,E,F
Question : List the types of resources available to use in a flow
A. Variable
B. Constant
C. Formula
D. Text
E. Template
F. Choice
G. Dynamic Choice
1. A,B,C,D
2. B,C,D,E
3. C,D,E,F
4. D,E,F,G
5. A,B,C,D,E,F,G
Question : List the types of Data Element available to use in a flow
A. Record Create
B. Record Update
C. Record Lookup
D. Record Delete
1. A,B,C
2. B,C,D
3. A,B,D
4. A,B,C,D
Question : Field History Tracking : It tracks modification to any standard or custom field, whose history is set to be tracked in the object's history related list
1. True
2. False